AWS Lambda Functions
Warning
Before you start, ensure that you can authenticate with Encord and your AWS CLI is authenticated.
Info
The following example shows the general structure of how to build an AWS Lambda function. For concrete implementations of agents with specific abilities, see the examples section.
There are two different ways in which you can create lambda functions.
They have different applications and properties. Before you dive into one of the examples, please consider the properties in the table below.
| Type | File size limits | Ease of use |
|---|---|---|
| Zip upload | 50MB (250MB unzipped) | easier |
| Docker | NA | harder |
AWS limits zip uploads to 50MB (250MB uncompressed), which means that if you want to use, e.g., computer vision capabillities (like pip install encord-agents[vision]), the bundle can very quickly become too large; forcing you to use Docker.
Other complications are that if you use specific dependencies that use C/C++ code under the hood, you have to install them with the right cpu architecture, which might cause you to have to upload your function before you can test it.
More detailed AWS Documentation on python lambda functions can be found here.
Building a lambda function using zip upload
The full AWS lambda documentation for zip files is available here.
STEP 1: Create a local Project
Start by creating a local project.
It will have two directories, a local virtual environment (named venv in this example) and a package directory
with the cpu-architecture-specific dependencies that will work int the cloud infrastructure.
First, let's create the virtual environment and install encord-agents. Please see the installation docs for more information.
mkdir my_project
cd my_project
python -m venv venv
source venv/bin/activate
pip install encord-agents
deactivate
Next, let's create the "mirror" package directory for the upload.
Note that it's advised to also install boto3 which is the AWS SDK (that will live in the lambda function anyway).
The reason is that then the boto3 dependency doesn't change version when AWS updates it's infrastructure.
mkdir package
pip install \
  --platform manylinux2014_x86_64 \
  --target=package \
  --implementation cp \
  --python-version 3.12 \
  --only-binary=:all: --upgrade \
  encord-agents boto3
STEP 2: Define the agent
Create a lambda_function.py file using the following template:
from encord.objects.ontology_labels_impl import LabelRowV2

from encord_agents.core.data_model import FrameData
from encord_agents.aws import editor_agent


@editor_agent()
def lambda_handler(frame_data: FrameData, label_row: LabelRowV2) -> None:
    print(frame_data.model_dump_json())
    # label_row.save()
Note that it's important to name both the file as lambda_function.py and the function lambda_handler if you want to follow this example.
Step 6 will use the two names in the --handler argument.
Complete the lambda_handler function with the logic you want to execute when the agent is triggered.
Tip
For more editor agent examples, see the examples section. You can inject multiple different dependencies into the function if necessary.
You can find multiple examples of what can be done with editor agents here.
STEP 3: (Optional) Test the agent locally
Warning
We are testing against the venv and not the package that is uploaded to AWS, so we might see slight differences in the outcome.
In order to test your agent locally, you can add an if __name__ == "__main__" declaration in the end of the file as follows:
# ... imports from before
@editor_agent()
def lambda_handler(frame_data: FrameData):
    print(frame_data.model_dump_json())

if __name__ == '__main__':
    event = {
        "body": {
            "projectHash": "aaaaaaaa-bbbb-cccc-dddd-eeeeeeeeeeee",
            "dataHash": "00000000-1111-2222-3333-444444444444",
            "frame": 0,
            "objectHashes": []
        }
    }
    lambda_handler(event, None)
Make sure to update the project and data hash to correspond to one of your assets.
Hint
If you open the label editor in your browser and look at the url, it has this pattern:
Then, run the file:
source venv/bin/activate
export ENCORD_SSH_KEY_FILE='/path/to/your/private-key-file'
python lambda_function.py
STEP 4: Create the ZIP file
Create the zip file by first zipping what is in the package directory:
Then add your lambda function to the zip file:
STEP 5: Set up an execution role
The lambda function needs permissions to execute. For that, we use an execution role.
Start by creating the configuration file trust-policy.json to be uploaded to aws.
{
  "Version": "2012-10-17",
  "Statement": [
    {
      "Effect": "Allow",
      "Principal": {
        "Service": "lambda.amazonaws.com"
      },
      "Action": "sts:AssumeRole"
    }
  ]
}
Then create a role with the trust policy:
aws iam create-role \
    --role-name lambda-execute-encord-agents \
    --assume-role-policy-document file://trust-policy.json
It should output something similar to the following JSON. Make sure to take a note of the Arn.
{
  "Role": {
    "Path": "/",
    "RoleName": "lambda-execute-encord-agents",
    "RoleId": "AROAQ7BEARV2DSFT2E3PI",
    "Arn": "arn:aws:iam::061234567890:role/lambda-execute-encord-agents",
    "CreateDate": "2025-05-09T10:39:35+00:00",
    "AssumeRolePolicyDocument": {
      "Version": "2012-10-17",
      "Statement": [
        {
          "Effect": "Allow",
          "Principal": {
            "Service": "lambda.amazonaws.com"
          },
          "Action": "sts:AssumeRole"
        }
      ]
    }
  }
}
Next, attach the basic lambda execution role to the role.
aws iam attach-role-policy \
    --role-name lambda-execute-encord-agents \
    --policy-arn arn:aws:iam::aws:policy/service-role/AWSLambdaBasicExecutionRole
STEP 6: Upload the zip
To upload the zip file to AWS, use the following command. Make sure to insert the <lambda_function_name> you want to use and the proper role Arn (the one we took a note of above):
aws lambda create-function --function-name <lambda_function_name> \
  --runtime python3.12 \
  --handler lambda_function.lambda_handler \
  --role arn:aws:iam::061234567890:role/lambda-execute-encord-agents \
  --zip-file fileb://package.zip
Hint
If you want to modify your lambda, follow the steps above again but call the update method rather than the create-function from the AWS CLI.
Now, proceed to Step A below to complete the setup.
Building a lambda function with Docker
The full AWS documentation for building docker images for lambda functions with Python is available here.
STEP 1: Create a local Project
Start by creating a local project directory.
Then add a requirements.txt file.
(Optional) local environment
If you want, you can create a local environment for testing before building the docker image.
STEP 2: Define the agent
Create a lambda_function.py file using the following template:
from encord.objects.ontology_labels_impl import LabelRowV2

from encord_agents.core.data_model import FrameData
from encord_agents.aws import editor_agent


@editor_agent()
def lambda_handler(frame_data: FrameData, label_row: LabelRowV2) -> None:
    print(frame_data.model_dump_json())
    # label_row.save()
Note that for the example to work, you should name both the file as lambda_function.py and the function lambda_handler.
The Docker image will look for those particular names in the next step.
Complete the lambda_handler function with the logic you want to execute when the agent is triggered.
Tip
For more editor agent examples, see the examples section. You can inject multiple different dependencies into the function if necessary.
You can find multiple examples of what can be done with editor agents here.
STEP 3: Build the docker image
Create a Dockerfile with the following content.
FROM public.ecr.aws/lambda/python:3.12

# Install the specified packages
COPY requirements.txt ${LAMBDA_TASK_ROOT}
RUN pip install -r requirements.txt

# Copy function code
COPY lambda_function.py ${LAMBDA_TASK_ROOT}

# Set the CMD to your handler
# (could also be done as a parameter override outside of the Dockerfile)
CMD [ "lambda_function.lambda_handler" ]
Now build the image locally.
Note
You need to have docker and buildx installed.
docker buildx build \
    --platform linux/amd64 \
    --provenance=false \
    -t encord-agents-my-agent-name:latest \
    .
STEP 4: (Optional) Test the agent locally
To test the agent locally, you can spin up the container with the following command.
docker run \
    -e ENCORD_SSH_KEY="$(cat /path/to/your/private-key-file)" \
    -p 9000:8080 \
    --platform linux/amd64 \
    -t encord-agents-my-agent-name:latest
The respective lines ensures that we
- Add the
ENCORD_SSH_KEYenv variable - Map the port 8080 to your own local port (9000 in this example)
- AWS architecture needs to be
amd64(orarm64see aws docs) - Run the latest built image (
encord-agents-example:latestin this example)
This will allow you to "hit" the function endpoint with a curl like the following.
The functions/function/invocation piece needs to be there; it's defined by Amazon.
curl "http://localhost:9000/2015-03-31/functions/function/invocations" \
    -X "POST" \
    -d '{
            "body": {
                "projectHash": "aaaaaaaa-ed79-4a1b-a0c1-b1b38ffb523c",
                "dataHash":"659c3a38-737f-4f56-a709-26ce01f5fd0b",
                "frame": 0,
                "objectHashes": []
            }
        }'
Note
There's a long standing issue with Lambda docker containers that the "API" is different when running locally and in the cloud. There are two relevant differences in this case.
Content-Type: Locally, the container expects a post request withContent-Type: application/x-www-form-urlencodedwhile the public url hosted by AWS expectsContent-Type: application/application-json.POSTdata: Locally, the post data needs to be{"body": {... content dict}}while the public url expects{... content dict}.
As a consequence, the equivalent curl request for a publicly hosted lambda function would be:
curl "https://<your_function_url_prefix>.lambda-url.eu-west-1.on.aws/" \
    -X "POST" \
    -H "Content-Type: application/json" \
    -d '{
        "projectHash": "aaaaaaaa-ed79-4a1b-a0c1-b1b38ffb523c",
        "dataHash":"659c3a38-737f-4f56-a709-26ce01f5fd0b",
        "frame": 0,
        "objectHashes": []
    }'
Step 5: Prepare ECR container repository
To be able to associate a lambda function with your container, the container needs to be uploaded to the AWS Elastic Container Registry (ECR). For that, we need a container repository.
Run the aws get-login-password command to authenticate the Docker CLI to your Amazon ECR registry.
- Set the
--regionvalue to the AWS Region where you want to create the Amazon ECR repository (we useeu-west-1in this example). - Replace 111122223333 with your AWS account ID.
aws ecr get-login-password --region eu-west-1 | docker login --username AWS --password-stdin 111122223333.dkr.ecr.eu-west-1.amazonaws.com
Create a repository in Amazon ECR using the create-repository command.
aws ecr create-repository \
    --repository-name <your-lambda-function-name> \
    --region us-east-1 \
    --image-scanning-configuration scanOnPush=true \
    --image-tag-mutability MUTABLE
If successful, you see a response like this:
{
    "repository": {
        "repositoryArn": "arn:aws:ecr:us-east-1:111122223333:repository/<your-lambda-function-name>",
        "registryId": "111122223333",
        "repositoryName": "<your-lambda-function-name>",
        "repositoryUri": "111122223333.dkr.ecr.us-east-1.amazonaws.com/<your-lambda-function-name>",
        "createdAt": "2025-05-12T10:39:01+00:00",
        "imageTagMutability": "MUTABLE",
        "imageScanningConfiguration": {
            "scanOnPush": true
        },
        "encryptionConfiguration": {
            "encryptionType": "AES256"
        }
    }
}
Copy the repositoryUri from the output.
Step 6: Upload the local docker image
Run the docker tag command to tag your local image into your Amazon ECR repository as the latest version.
In the following command:
encord-agents-my-agent-name:latestis the name and tag of your local Docker image. This is the image name and tag that you specified in thedocker buildcommand above.- Replace
with the repositoryUrithat you copied above. Make sure to include:latestat the end of the URI.
Now that the tag lines up with ECR, we can push that tag.
Run the docker push command to deploy your local image to the Amazon ECR repository.
Make sure to include :latest at the end of the repository URI.
STEP 7: Set up an execution role
The lambda function needs permissions to execute. For that, we use an execution role.
Start by creating the configuration file trust-policy.json to be uploaded to aws.
{
  "Version": "2012-10-17",
  "Statement": [
    {
      "Effect": "Allow",
      "Principal": {
        "Service": "lambda.amazonaws.com"
      },
      "Action": "sts:AssumeRole"
    }
  ]
}
Then create a role with the trust policy:
aws iam create-role \
    --role-name lambda-execute-encord-agents \
    --assume-role-policy-document file://trust-policy.json
It should output something similar to the following JSON. Make sure to take a note of the Arn.
{
  "Role": {
    "Path": "/",
    "RoleName": "lambda-execute-encord-agents",
    "RoleId": "AROAQ7BEARV2DSFT2E3PI",
    "Arn": "arn:aws:iam::061234567890:role/lambda-execute-encord-agents",
    "CreateDate": "2025-05-09T10:39:35+00:00",
    "AssumeRolePolicyDocument": {
      "Version": "2012-10-17",
      "Statement": [
        {
          "Effect": "Allow",
          "Principal": {
            "Service": "lambda.amazonaws.com"
          },
          "Action": "sts:AssumeRole"
        }
      ]
    }
  }
}
Next, attach the basic lambda execution role to the role.
aws iam attach-role-policy \
    --role-name lambda-execute-encord-agents \
    --policy-arn arn:aws:iam::aws:policy/service-role/AWSLambdaBasicExecutionRole
STEP 8: Creating a lambda function
Create the Lambda function.
For ImageUri, specify the repository URI from Step 5.
Make sure to include :latest at the end of the URI.
aws lambda create-function \
  --function-name <my-function-name> \
  --package-type Image \
  --code ImageUri=111122223333.dkr.ecr.us-east-1.amazonaws.com/<your-lambda-function-name>:latest \
  --role arn:aws:iam::061234567890:role/lambda-execute-encord-agents
Hint
If you want to update the container image, you need to follow the above procedure again. Thas is, build the container (Step 3); tag and with the repository uri and upload (Step 6).
Then, instead of the create-function call in the end, you do
aws lambda update-function-code \
    --function-name pdf-qa \
    --image-uri 111122223333.dkr.ecr.us-east-1.amazonaws.com/<your-lambda-function-name>:latest \
    --publish
The URL will remain the same so no need to reconfigure CORS and all that.
Now, proceed to Step A below to complete the setup.
Communication with Encord
STEP A: Configure public endpoint
Now the function is live but not publicly available to the internet. To make it accessible to the Encord platform, follow these steps:
- Go to https://console.aws.amazon.com/lambda and navigate to your newly created function.
- Go to the Configuration tab and choose the Function URL section.
- Click the Create function URL button
- Choose Auth type
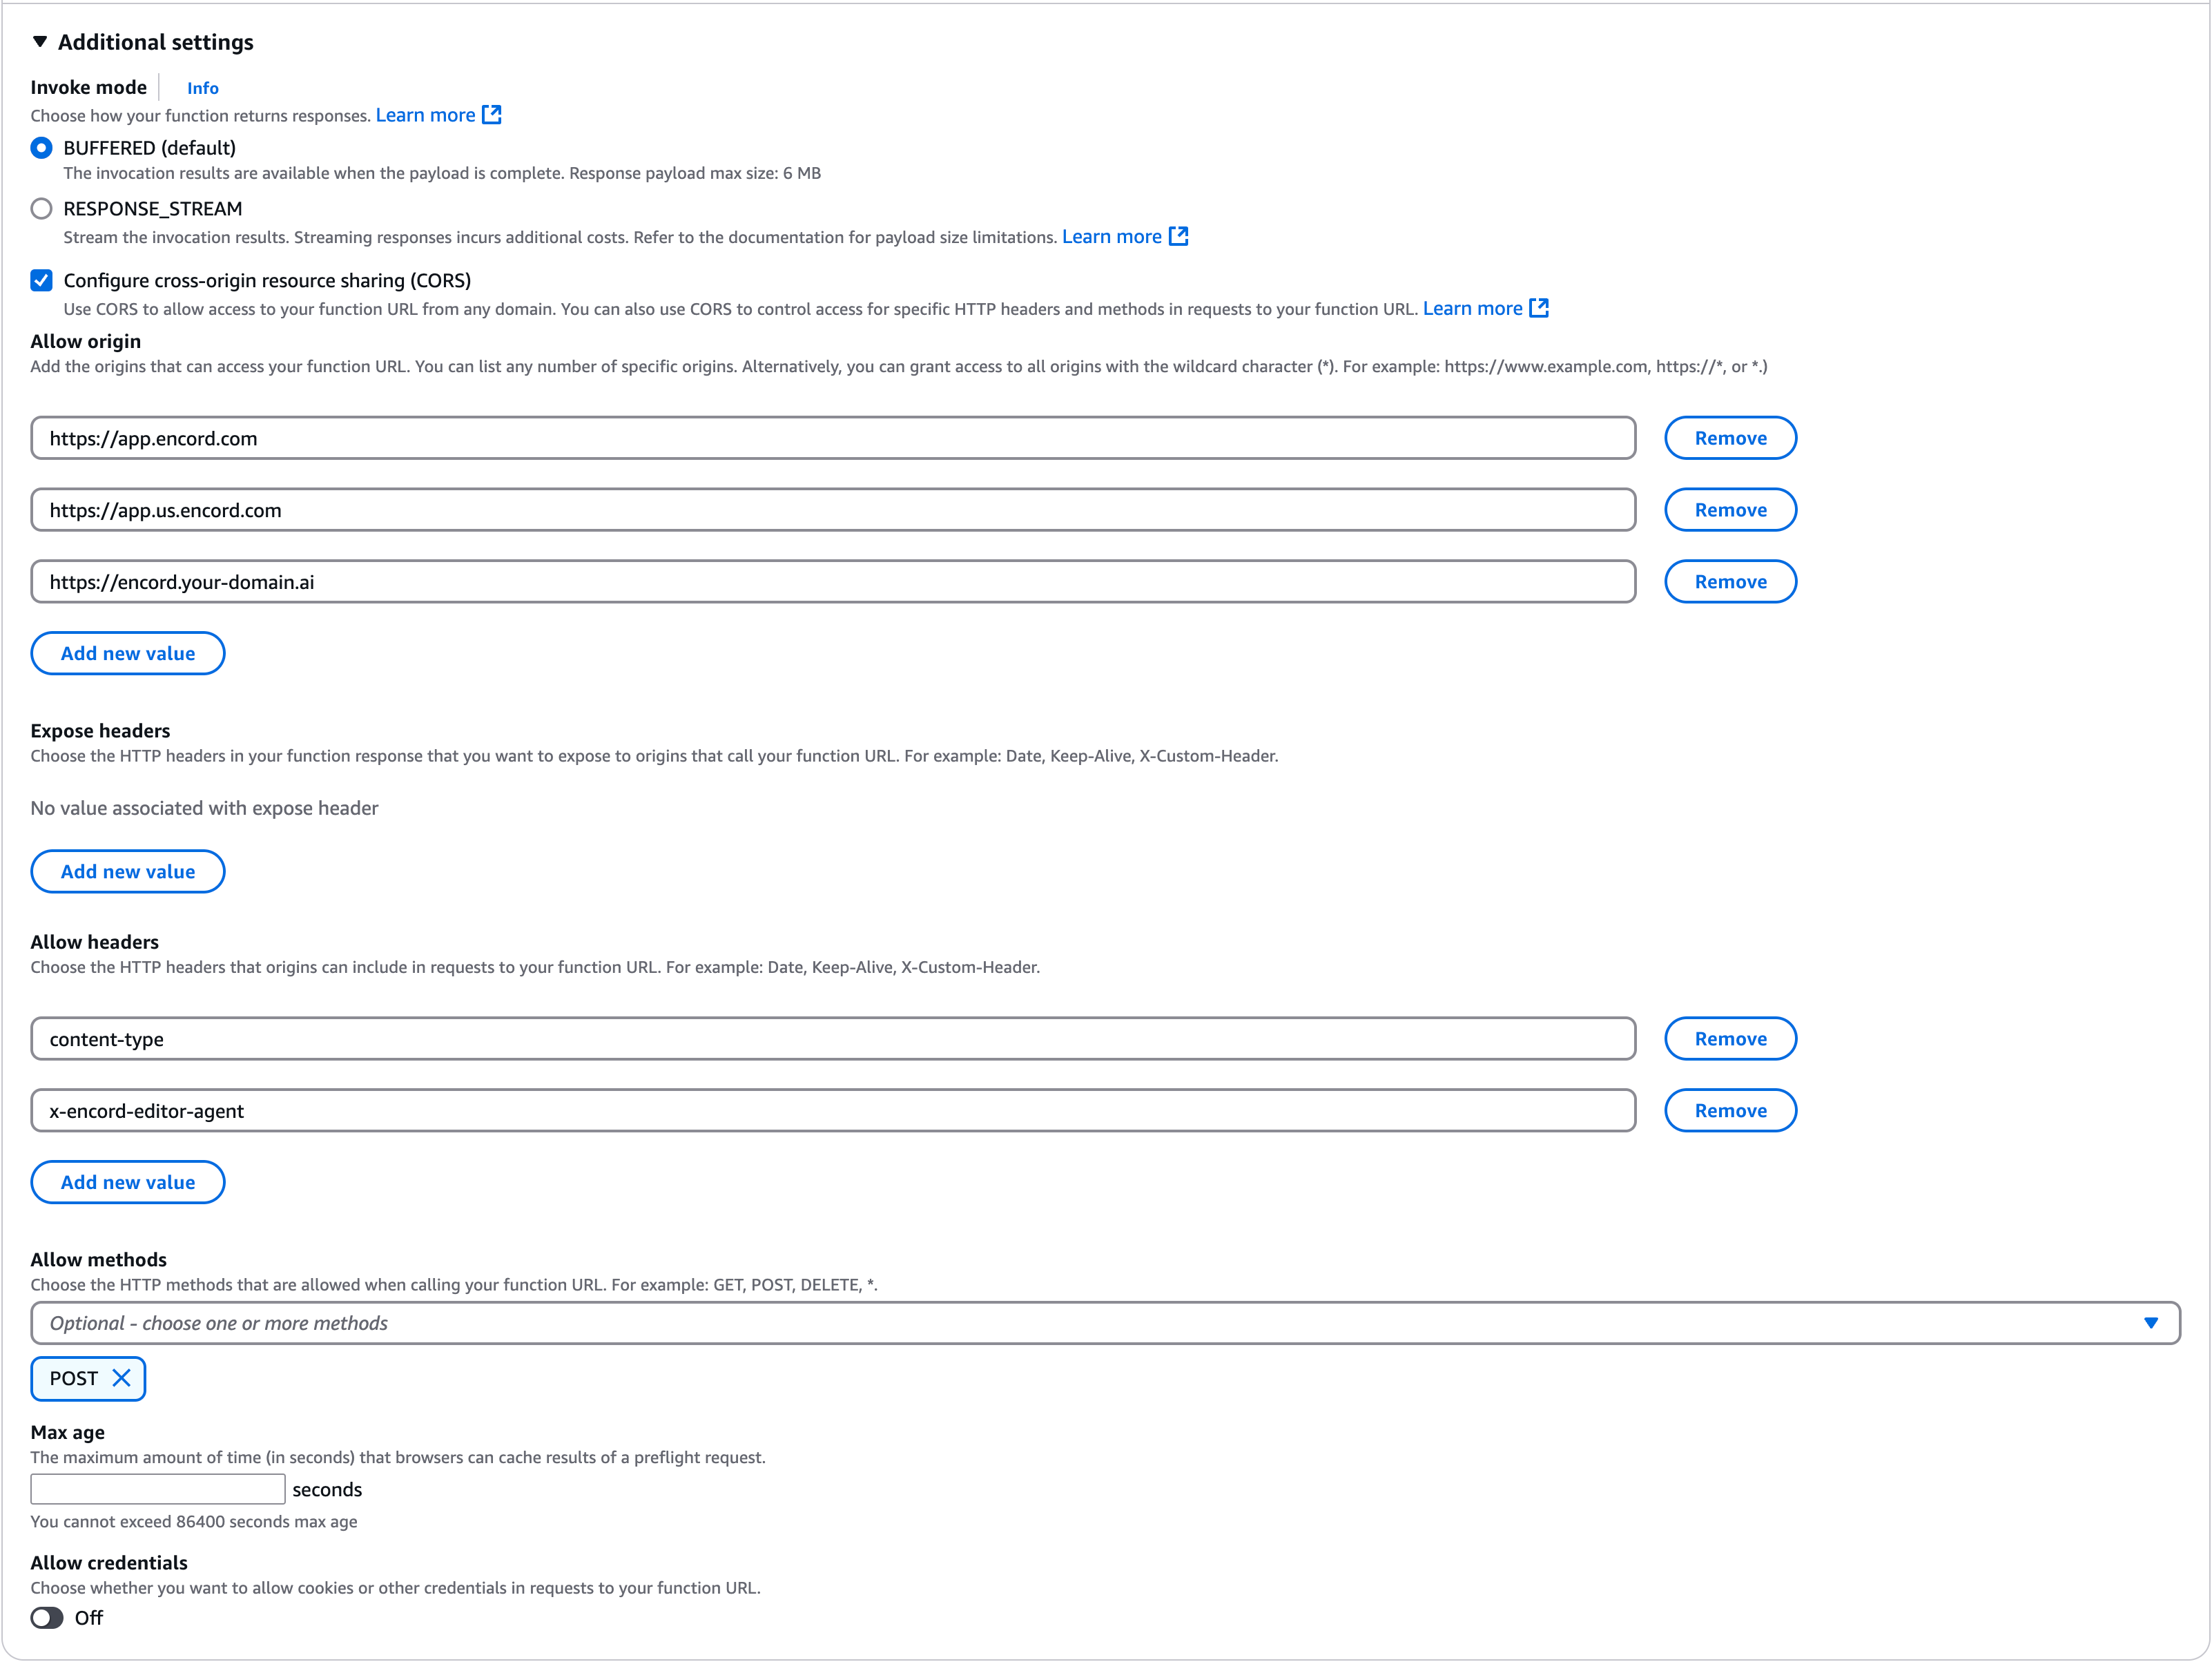
NONE - Expand the Additional settings panel and check the Configure cross-origin resource sharing (CORS) box
- Add
https://app.encord.com,https://app.us.encord.com, or your custom (VPC) domain in the Allow origin section - Add both
content-typeandx-encord-editor-agentvalues under the Allow headers section - Choose
POSTin the Allow methods section - Click Save
The configuration should look similar to the following image (potentially with less allowed origins).
Hint
You can click the image to expand it.
STEP B: Adding secrets
Your agent will need an ssh key secret. In the AWS console where you configured the function url, click the Environment variables tab on the left.
Add the ENCORD_SSH_KEY variable (and any other you need, e.g., HuggingFace, OpenAI, or Gemini credentials).
Tip
It is a good idea to create a service account with Encord and use an ssh key associated to that account such that you only provide access to what's actually necessary.
STEP C: Associating the URL with Encord
Now that you have everything set up with AWS, the top of the AWS web page will display your function url. Copy that url and navigate over to the Encord app.
- Click the Agents section on the left, and navigate to the Editor agents tab.
- Click the Register editor agent tab
- Give the agent a name, (optionally) a description, and paste the function url before clicking Register agent
Now you can click the Test agent button to verify the the agent is alive and that CORS is set up correctly.