Examples
Basic Geometric example using objectHashes
GCP Examples
A simple example of how you might utilise the objectHashes can be done via:
from typing import Annotated

from encord.objects.ontology_labels_impl import LabelRowV2
from encord.objects.ontology_object_instance import ObjectInstance

from encord_agents.core.data_model import FrameData
from encord_agents.core.dependencies import Depends
from encord_agents.gcp.dependencies import dep_objects
from encord_agents.gcp.wrappers import editor_agent


@editor_agent
def handle_object_hashes(
    frame_data: FrameData,
    lr: LabelRowV2,
    object_instances: Annotated[list[ObjectInstance], Depends(dep_objects)],
) -> None:
    for object_inst in object_instances:
        print(object_inst)
An example use case of the above: Suppose that I have my own OCR model and I want to selectively run OCR on objects I've selected from the Encord app. You can then trigger your agent from the app and it'll appropriately send a list of objectHashes to your agent. Then via the dep_objects method above, it gives the agent immediate access to the object instance making it easier to integrate your OCR model.
Test the Agent
- Save the above code as
agent.py. - Then in your current terminal, run the following command to run the agent in debug mode.
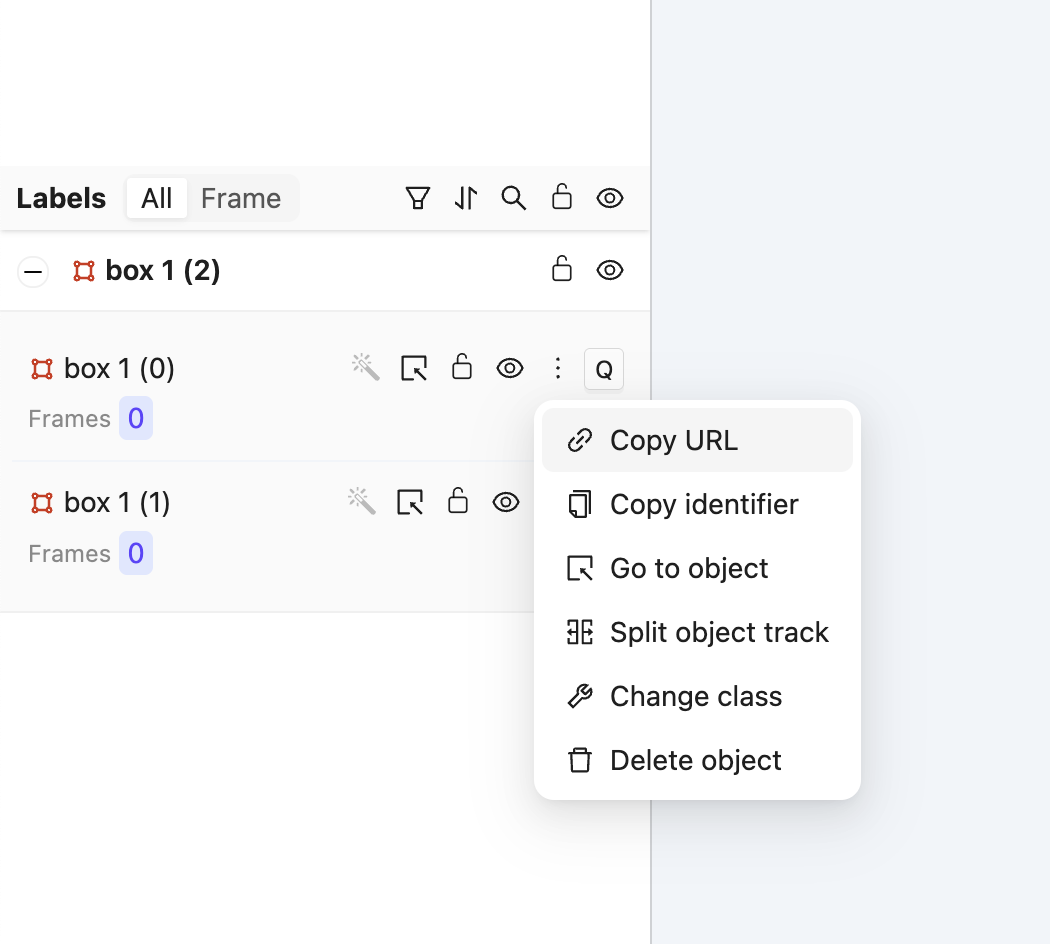
- Open your Project in the Encord platform and navigate to a frame with an object that you want to act on. Choose an object from the bottom left sider and click
Copy URLas shown:
Tip
The url should have roughly this format: "https://app.encord.com/label_editor/{project_hash}/{data_hash}/{frame}/0?other_query_params&objectHash={objectHash}".
-
In another shell operating from the same working directory, source your virtual environment and test the agent.
-
To see if the test is successful, refresh your browser to see the action taken by the Agent. Once the test runs successfully, you are ready to deploy your agent. Visit the deployment documentation to learn more.
Nested Classification using Claude 3.5 Sonnet
The goals of this example are:
- Create an editor agent that automatically adds frame-level classifications.
- Demonstrate how to use the
OntologyDataModelfor classifications.
Prerequisites
Before you begin, ensure you have:
- Created a virtual Python environment.
- Installed all necessary dependencies.
- Have an Anthropic API key.
- Are able to authenticate with Encord.
Run the following commands to set up your environment:
python -m venv venv                 # Create a virtual Python environment
source venv/bin/activate            # Activate the virtual environment
python -m pip install encord-agents anthropic  # Install required dependencies
export ANTHROPIC_API_KEY="<your_api_key>"     # Set your Anthropic API key
export ENCORD_SSH_KEY_FILE="/path/to/your/private/key"  # Define your Encord SSH key
Project Setup
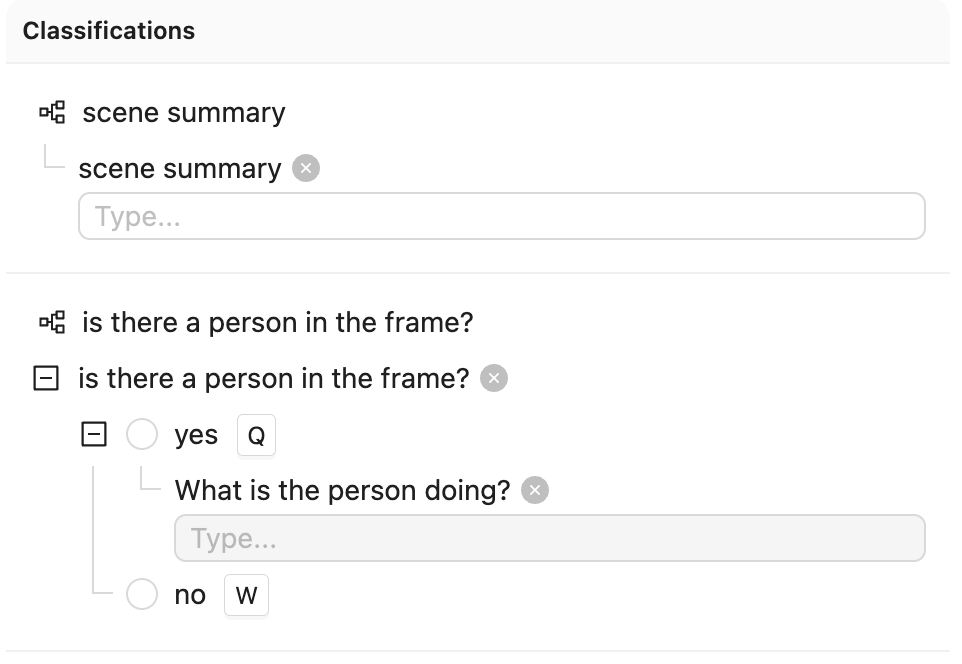
Create a Project with visual content (images, image groups, image sequences, or videos) in Encord. This example uses the following Ontology, but any Ontology containing classifications can be used.
See the ontology JSON
{
  "objects": [],
  "classifications": [
    {
      "id": "1",
      "featureNodeHash": "TTkHMtuD",
      "attributes": [
        {
          "id": "1.1",
          "featureNodeHash": "+1g9I9Sg",
          "type": "text",
          "name": "scene summary",
          "required": false,
          "dynamic": false
        }
      ]
    },
    {
      "id": "2",
      "featureNodeHash": "xGV/wCD0",
      "attributes": [
        {
          "id": "2.1",
          "featureNodeHash": "k3EVexk7",
          "type": "radio",
          "name": "is there a person in the frame?",
          "required": false,
          "options": [
            {
              "id": "2.1.1",
              "featureNodeHash": "EkGwhcO4",
              "label": "yes",
              "value": "yes",
              "options": [
                {
                  "id": "2.1.1.1",
                  "featureNodeHash": "mj9QCDY4",
                  "type": "text",
                  "name": "What is the person doing?",
                  "required": false
                }
              ]
            },
            {
              "id": "2.1.2",
              "featureNodeHash": "37rMLC/v",
              "label": "no",
              "value": "no",
              "options": []
            }
          ],
          "dynamic": false
        }
      ]
    }
  ]
}
To construct the same Ontology as used in this example, run the following script.
import json
from encord.objects.ontology_structure import OntologyStructure
from encord_agents.core.utils import get_user_client

encord_client = get_user_client()
structure = OntologyStructure.from_dict(json.loads("{the_json_above}"))
ontology = encord_client.create_ontology(
    title="Your ontology title",
    structure=structure
)
print(ontology.ontology_hash)
The aim is to trigger an agent that transforms a labeling task from Figure A to Figure B. (Hint: Click the images and use the keyboard arrows to toggle between them.)
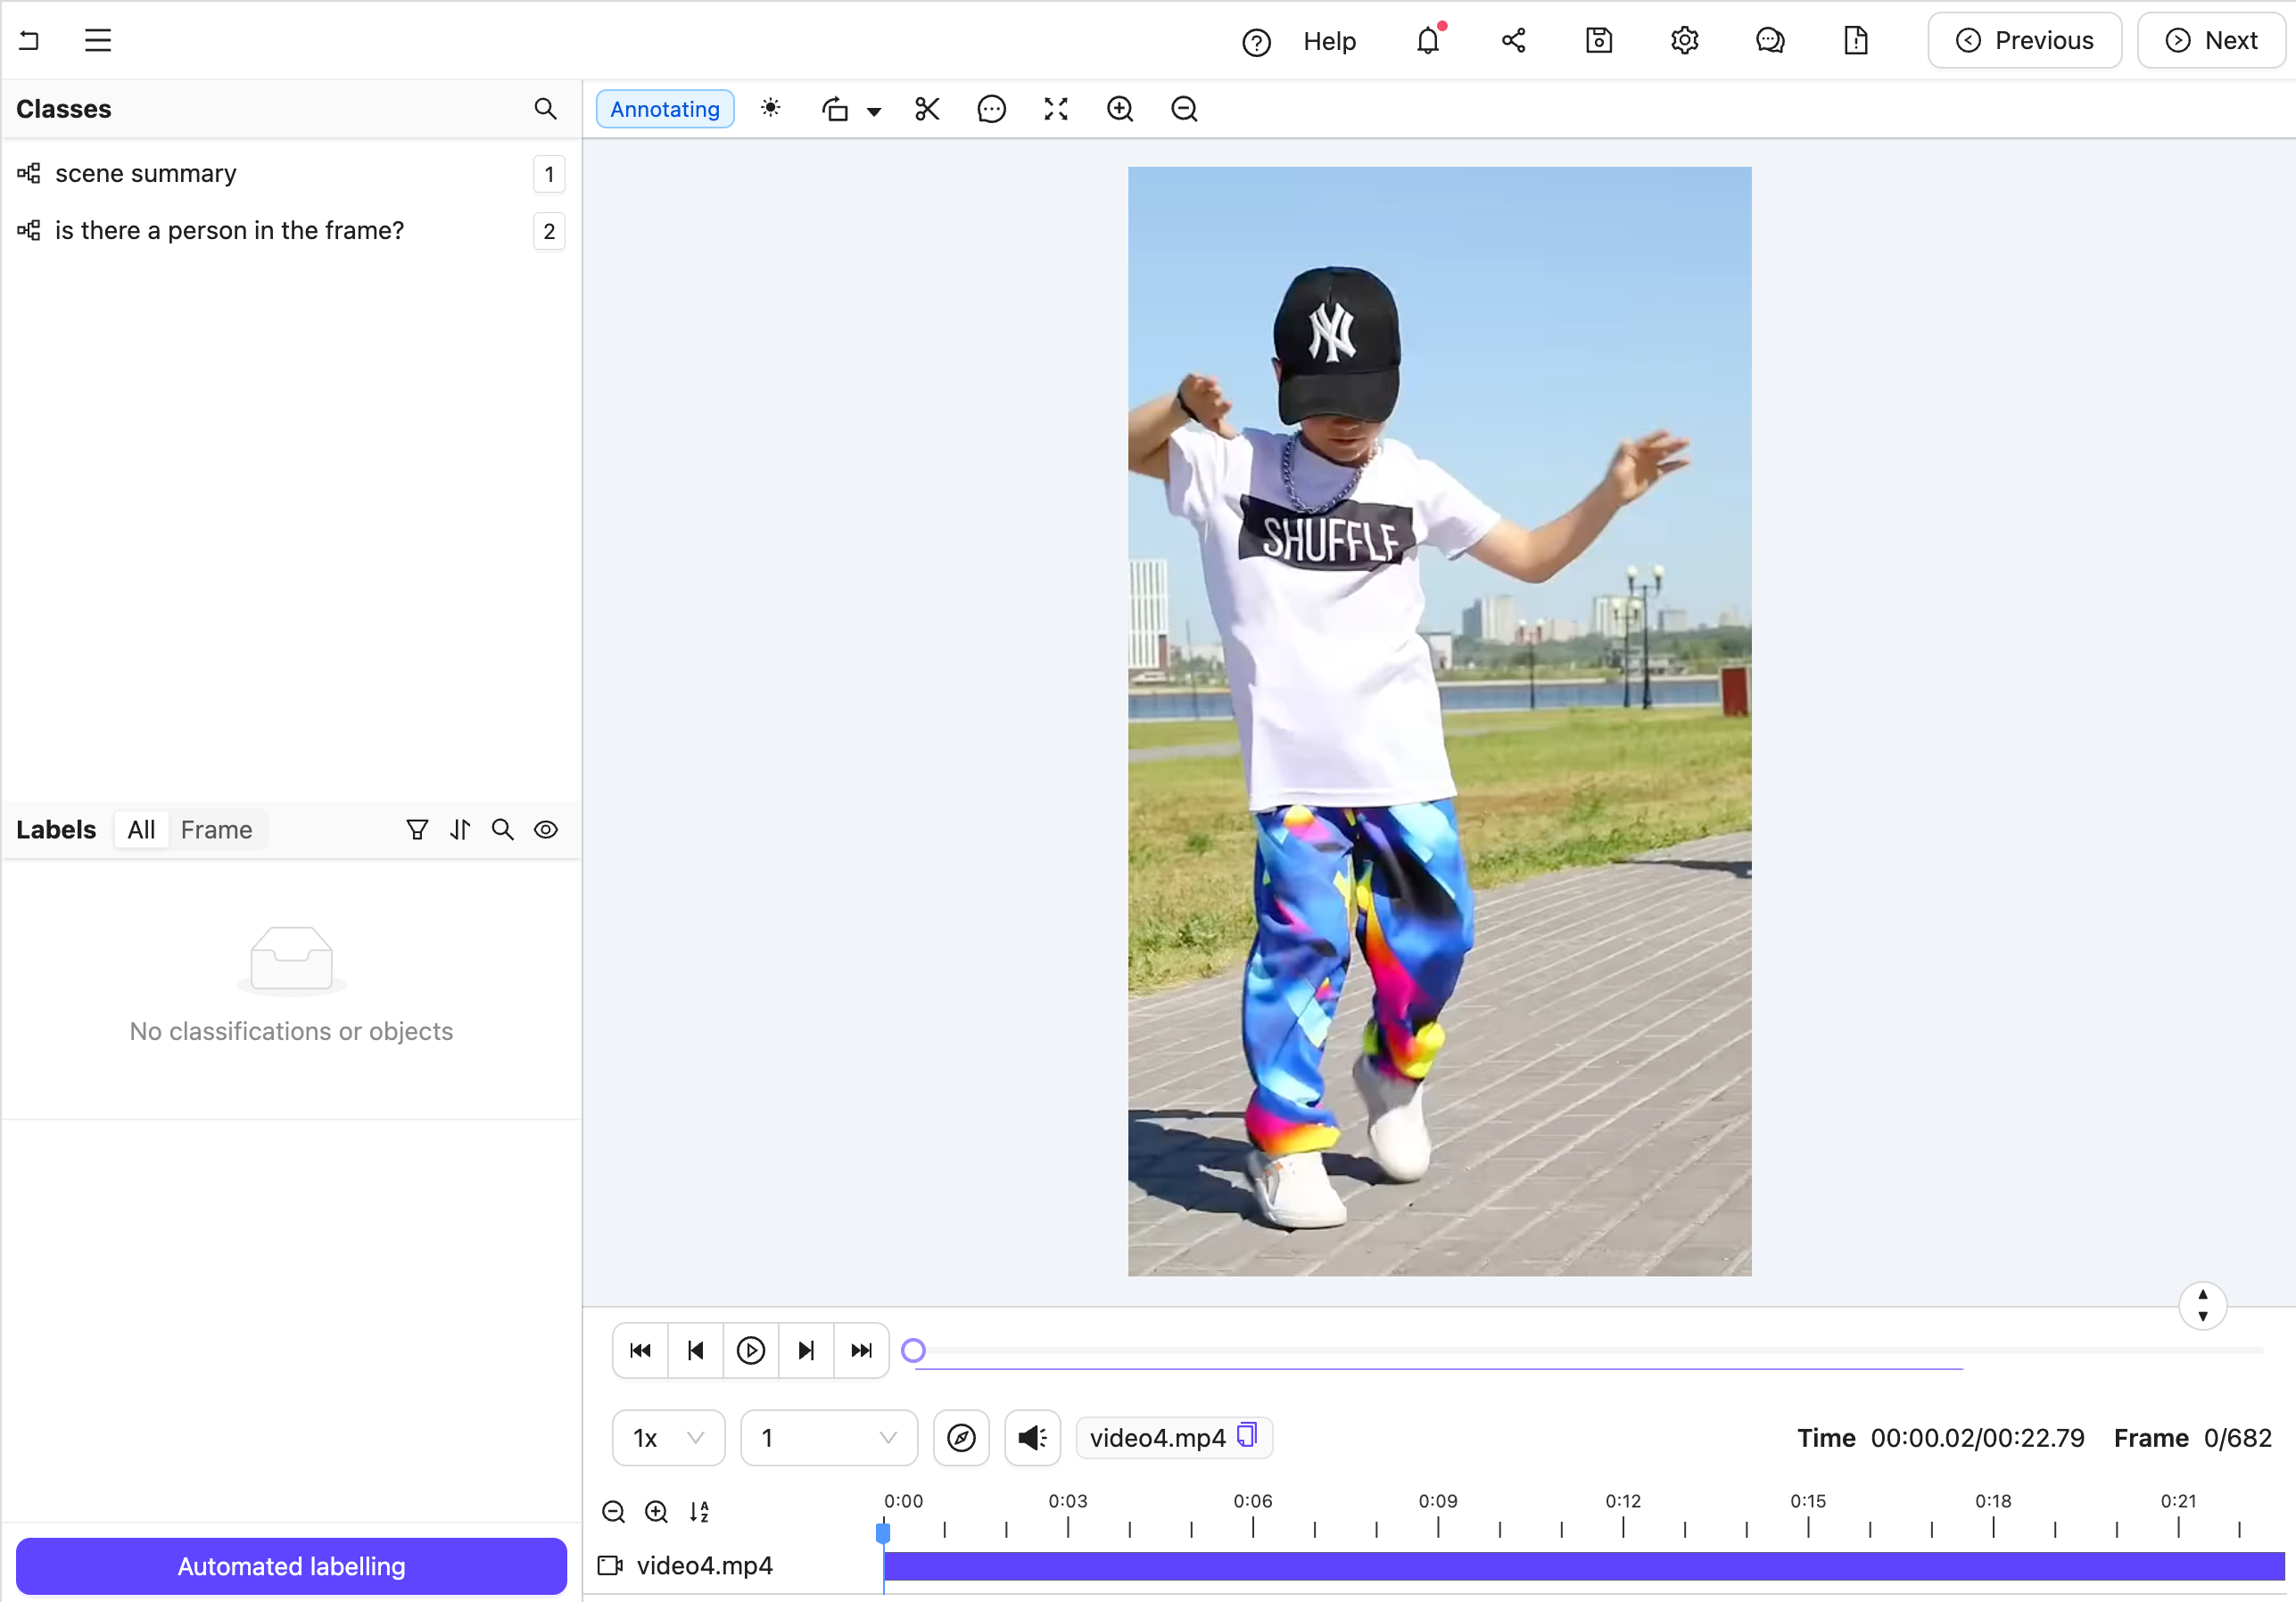 Figure A: No classification labels.
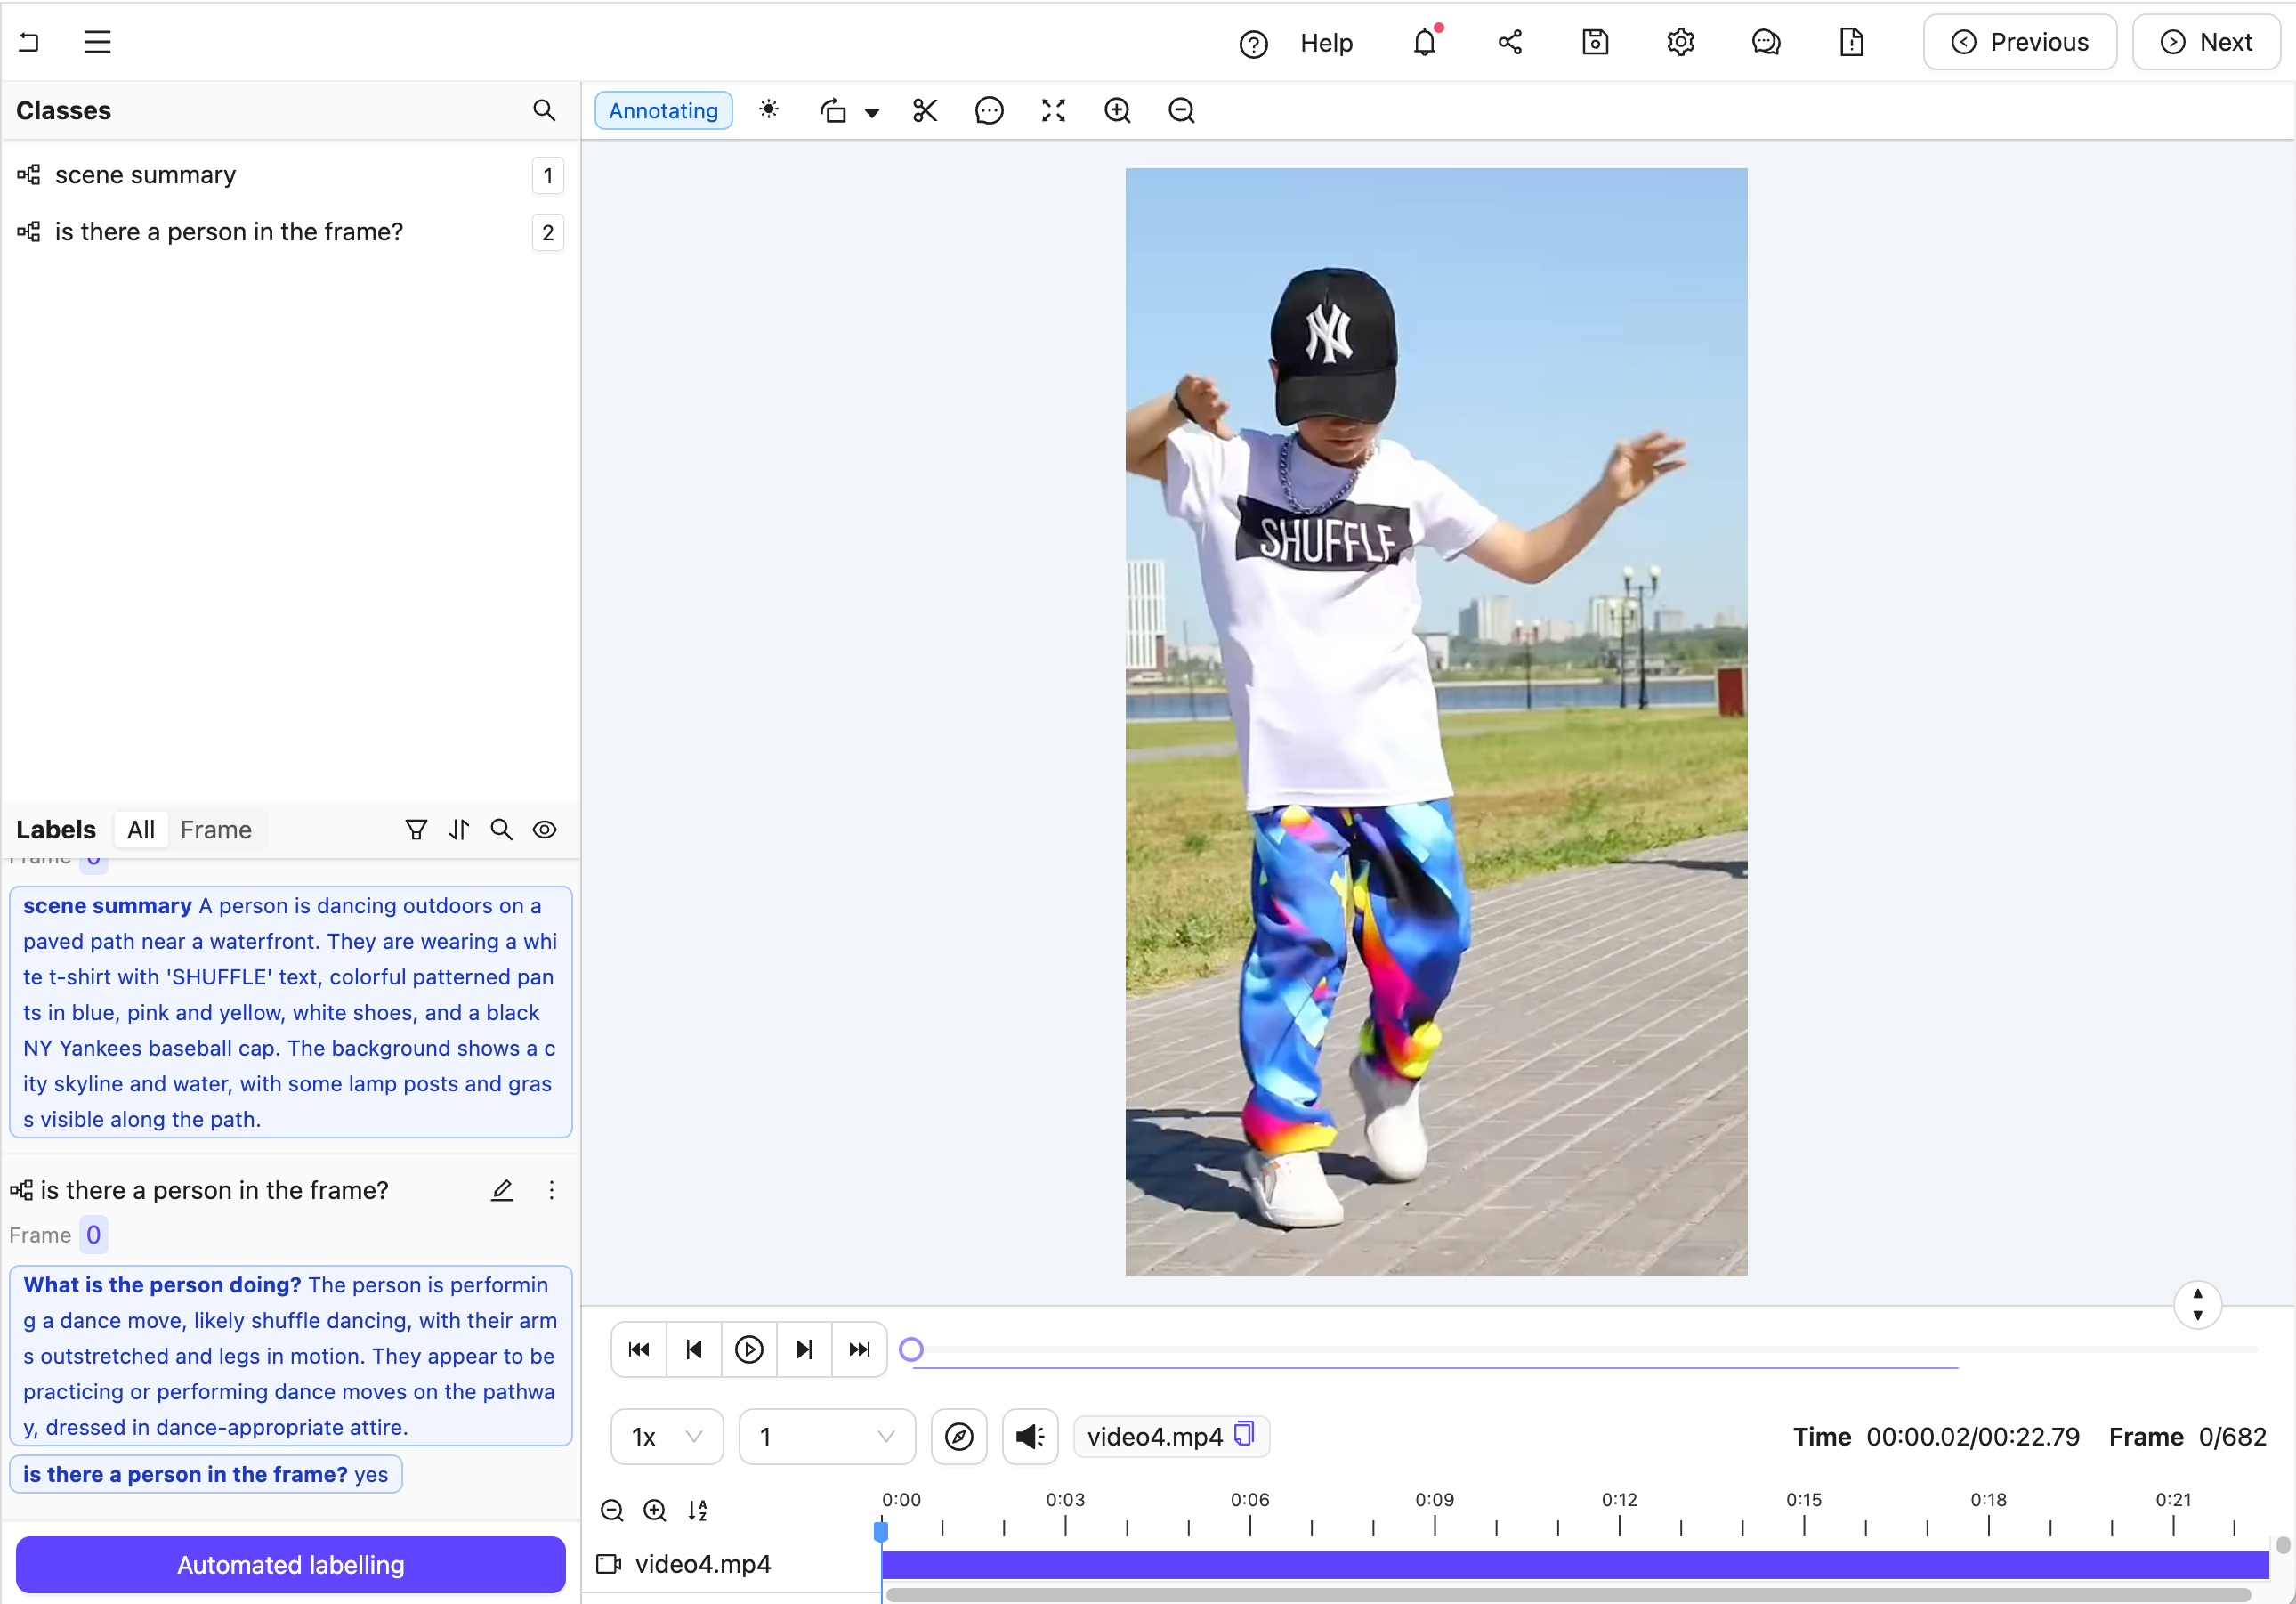 Figure B: Multiple nested classification labels generated by an LLM.
Create the Agent
Here is the full code, but a section-by-section explanation follows.
The full code for agent.py
-
Import dependencies and set up the Project.
Info
Ensure you insert your Project's unique identifier.
agent.pyimport os from anthropic import Anthropic from encord.objects.ontology_labels_impl import LabelRowV2 from numpy.typing import NDArray from typing_extensions import Annotated from encord_agents.core.ontology import OntologyDataModel from encord_agents.core.utils import get_user_client from encord_agents.core.video import Frame from encord_agents.gcp import Depends, editor_agent from encord_agents.gcp.dependencies import FrameData, dep_single_frame client = get_user_client() project = client.get_project("<your_project_hash>") -
Create a data model and a system prompt based on the Project Ontology to tell Claude how to structure its response:
agent.pydata_model = OntologyDataModel(project.ontology_structure.classifications) system_prompt = f""" You're a helpful assistant that's supposed to help fill in json objects according to this schema: ```json {data_model.model_json_schema_str} ``` Please only respond with valid json. """See the result of
data_model.model_json_schema_strfor the given example{ "$defs": { "IsThereAPersonInTheFrameRadioModel": { "properties": { "feature_node_hash": { "const": "k3EVexk7", "description": "UUID for discrimination. Must be included in json as is.", "enum": [ "k3EVexk7" ], "title": "Feature Node Hash", "type": "string" }, "choice": { "description": "Choose exactly one answer from the given options.", "discriminator": { "mapping": { "37rMLC/v": "#/$defs/NoNestedRadioModel", "EkGwhcO4": "#/$defs/YesNestedRadioModel" }, "propertyName": "feature_node_hash" }, "oneOf": [ { "$ref": "#/$defs/YesNestedRadioModel" }, { "$ref": "#/$defs/NoNestedRadioModel" } ], "title": "Choice" } }, "required": [ "feature_node_hash", "choice" ], "title": "IsThereAPersonInTheFrameRadioModel", "type": "object" }, "NoNestedRadioModel": { "properties": { "feature_node_hash": { "const": "37rMLC/v", "description": "UUID for discrimination. Must be included in json as is.", "enum": [ "37rMLC/v" ], "title": "Feature Node Hash", "type": "string" }, "title": { "const": "no", "default": "Constant value - should be included as-is.", "enum": [ "no" ], "title": "Title", "type": "string" } }, "required": [ "feature_node_hash" ], "title": "NoNestedRadioModel", "type": "object" }, "SceneSummaryTextModel": { "properties": { "feature_node_hash": { "const": "+1g9I9Sg", "description": "UUID for discrimination. Must be included in json as is.", "enum": [ "+1g9I9Sg" ], "title": "Feature Node Hash", "type": "string" }, "value": { "description": "Please describe the image as accurate as possible focusing on 'scene summary'", "maxLength": 1000, "minLength": 0, "title": "Value", "type": "string" } }, "required": [ "feature_node_hash", "value" ], "title": "SceneSummaryTextModel", "type": "object" }, "WhatIsThePersonDoingTextModel": { "properties": { "feature_node_hash": { "const": "mj9QCDY4", "description": "UUID for discrimination. Must be included in json as is.", "enum": [ "mj9QCDY4" ], "title": "Feature Node Hash", "type": "string" }, "value": { "description": "Please describe the image as accurate as possible focusing on 'What is the person doing?'", "maxLength": 1000, "minLength": 0, "title": "Value", "type": "string" } }, "required": [ "feature_node_hash", "value" ], "title": "WhatIsThePersonDoingTextModel", "type": "object" }, "YesNestedRadioModel": { "properties": { "feature_node_hash": { "const": "EkGwhcO4", "description": "UUID for discrimination. Must be included in json as is.", "enum": [ "EkGwhcO4" ], "title": "Feature Node Hash", "type": "string" }, "what_is_the_person_doing": { "$ref": "#/$defs/WhatIsThePersonDoingTextModel", "description": "A text attribute with carefully crafted text to describe the property." } }, "required": [ "feature_node_hash", "what_is_the_person_doing" ], "title": "YesNestedRadioModel", "type": "object" } }, "properties": { "scene_summary": { "$ref": "#/$defs/SceneSummaryTextModel", "description": "A text attribute with carefully crafted text to describe the property." }, "is_there_a_person_in_the_frame": { "$ref": "#/$defs/IsThereAPersonInTheFrameRadioModel", "description": "A mutually exclusive radio attribute to choose exactly one option that best matches to the give visual input." } }, "required": [ "scene_summary", "is_there_a_person_in_the_frame" ], "title": "ClassificationModel", "type": "object" } -
Create an Anthropic API client to communicate with Claude.
-
Define the editor agent.
agent.py@editor_agent() def agent( frame_data: FrameData, lr: LabelRowV2, content: Annotated[NDArray, Depends(dep_single_frame)], ): frame = Frame(frame_data.frame, content=content) message = anthropic_client.messages.create( model="claude-3-5-sonnet-20241022", max_tokens=1024, system=system_prompt, messages=[ { "role": "user", "content": [frame.b64_encoding(output_format="anthropic")], } ], ) try: classifications = data_model(message.content[0].text) for clf in classifications: clf.set_for_frames(frame_data.frame, confidence=0.5, manual_annotation=False) lr.add_classification_instance(clf) except Exception: import traceback traceback.print_exc() print(f"Response from model: {message.content[0].text}") lr.save()
The agent follows these steps:
- Automatically retrieves the frame content using the
dep_single_framedependency. - Sends the frame image to Claude for analysis.
- Parses Claude's response into classification instances using the predefined data model.
- Adds the classifications to the label row and saves the results.
Test the Agent
-
In your current terminal, run the following command to run the agent in debug mode.
-
Open your Project in the Encord platform and navigate to a frame you want to add a classification to. Copy the URL from your browser.
Tip
The url should have roughly this format:
"https://app.encord.com/label_editor/{project_hash}/{data_hash}/{frame}". -
In another shell operating from the same working directory, source your virtual environment and test the agent.
-
To see if the test is successful, refresh your browser to view the classifications generated by Claude. Once the test runs successfully, you are ready to deploy your agent. Visit the deployment documentation to learn more.
Nested Attributes using Claude 3.5 Sonnet
The goals of this example are:
- Create an editor agent that can convert generic object annotations (class-less coordinates) into class specific annotations with nested attributes like descriptions, radio buttons, and checklists.
- Demonstrate how to use both the
OntologyDataModeland thedep_object_cropsdependency.
Prerequisites
Before you begin, ensure you have:
- Created a virtual Python environment.
- Installed all necessary dependencies.
- Have an Anthropic API key.
- Are able to authenticate with Encord.
Run the following commands to set up your environment:
python -m venv venv # Create a virtual Python environment
source venv/bin/activate # Activate the virtual environment
python -m pip install encord-agents anthropic # Install required dependencies
export ANTHROPIC_API_KEY="<your_api_key>" # Set your Anthropic API key
export ENCORD_SSH_KEY_FILE="/path/to/your/private/key" # Define your Encord SSH key
Project Setup
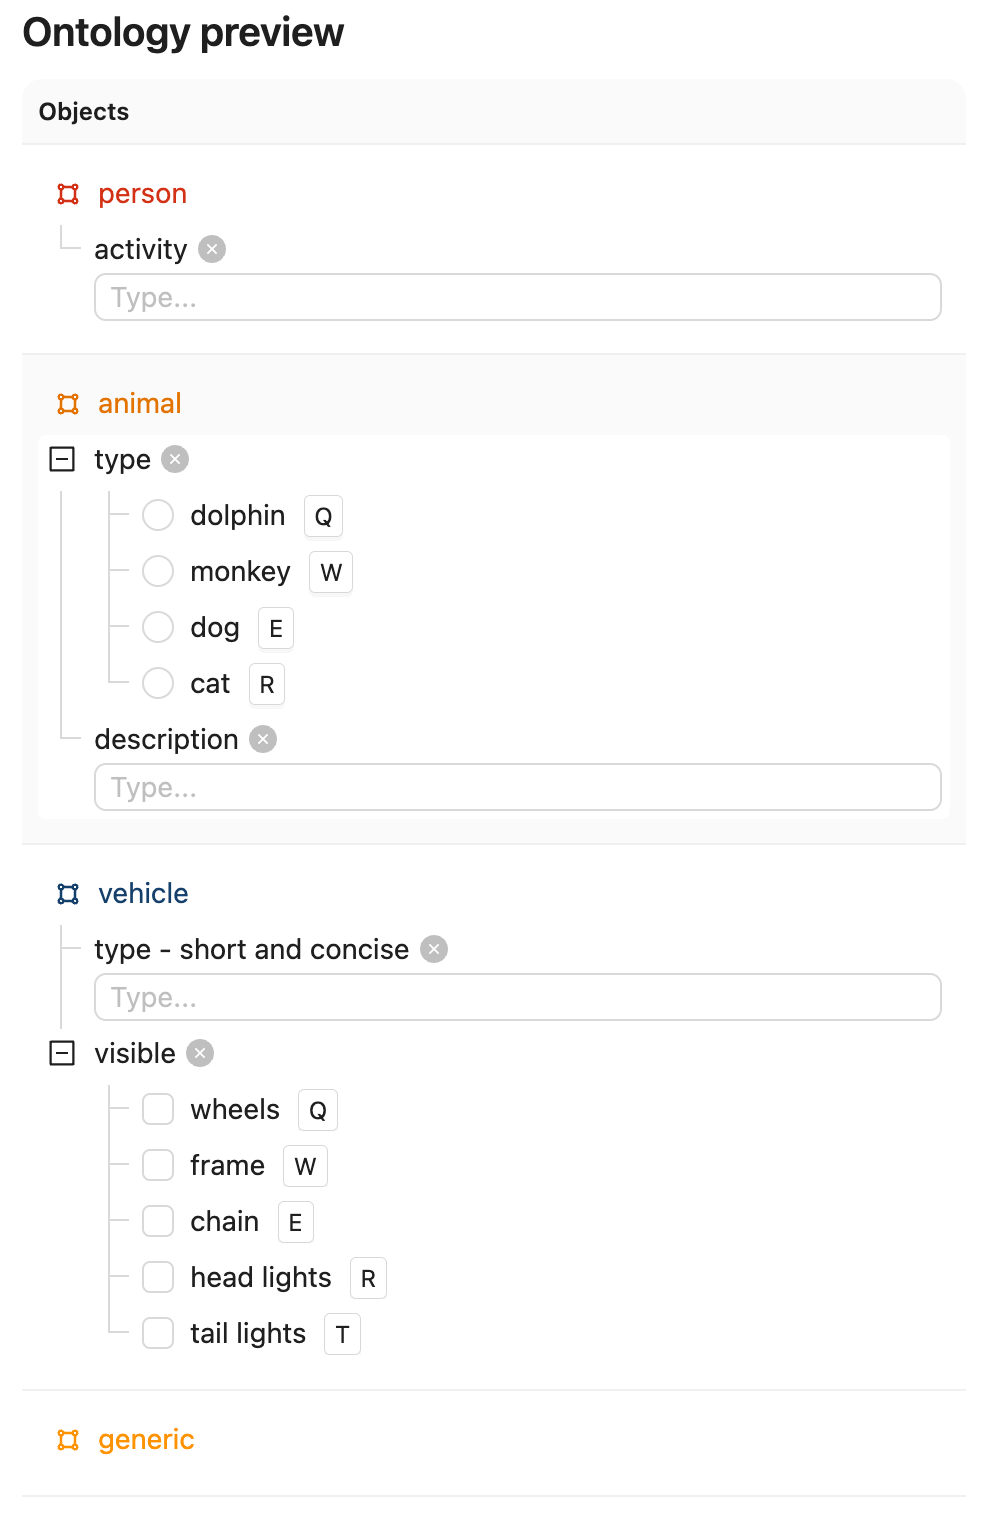
Create a Project with visual content (images, image groups, image sequences, or videos) in Encord. This example uses the following Ontology, but any Ontology containing classifications can be used provided the object types are the same and there is one entry called "generic".
See the ontology JSON
{
"objects": [
{
"id": "1",
"name": "person",
"color": "#D33115",
"shape": "bounding_box",
"featureNodeHash": "2xlDPPAG",
"required": false,
"attributes": [
{
"id": "1.1",
"featureNodeHash": "aFCN9MMm",
"type": "text",
"name": "activity",
"required": false,
"dynamic": false
}
]
},
{
"id": "2",
"name": "animal",
"color": "#E27300",
"shape": "bounding_box",
"featureNodeHash": "3y6JxTUX",
"required": false,
"attributes": [
{
"id": "2.1",
"featureNodeHash": "2P7LTUZA",
"type": "radio",
"name": "type",
"required": false,
"options": [
{
"id": "2.1.1",
"featureNodeHash": "gJvcEeLl",
"label": "dolphin",
"value": "dolphin",
"options": []
},
{
"id": "2.1.2",
"featureNodeHash": "CxrftGS4",
"label": "monkey",
"value": "monkey",
"options": []
},
{
"id": "2.1.3",
"featureNodeHash": "OQyWm7Sm",
"label": "dog",
"value": "dog",
"options": []
},
{
"id": "2.1.4",
"featureNodeHash": "CDKmYJK/",
"label": "cat",
"value": "cat",
"options": []
}
],
"dynamic": false
},
{
"id": "2.2",
"featureNodeHash": "5fFgrM+E",
"type": "text",
"name": "description",
"required": false,
"dynamic": false
}
]
},
{
"id": "3",
"name": "vehicle",
"color": "#16406C",
"shape": "bounding_box",
"featureNodeHash": "llw7qdWW",
"required": false,
"attributes": [
{
"id": "3.1",
"featureNodeHash": "79mo1G7Q",
"type": "text",
"name": "type - short and concise",
"required": false,
"dynamic": false
},
{
"id": "3.2",
"featureNodeHash": "OFrk07Ds",
"type": "checklist",
"name": "visible",
"required": false,
"options": [
{
"id": "3.2.1",
"featureNodeHash": "KmX/HjRT",
"label": "wheels",
"value": "wheels"
},
{
"id": "3.2.2",
"featureNodeHash": "H6qbEcdj",
"label": "frame",
"value": "frame"
},
{
"id": "3.2.3",
"featureNodeHash": "gZ9OucoQ",
"label": "chain",
"value": "chain"
},
{
"id": "3.2.4",
"featureNodeHash": "cit3aZSz",
"label": "head lights",
"value": "head_lights"
},
{
"id": "3.2.5",
"featureNodeHash": "qQ3PieJ/",
"label": "tail lights",
"value": "tail_lights"
}
],
"dynamic": false
}
]
},
{
"id": "4",
"name": "generic",
"color": "#FE9200",
"shape": "bounding_box",
"featureNodeHash": "jootTFfQ",
"required": false,
"attributes": []
}
],
"classifications": []
}
`
To construct the Ontology used in this example, run the following script:
```python
import json
from encord.objects.ontology_structure import OntologyStructure
from encord_agents.core.utils import get_user_client
encord_client = get_user_client()
structure = OntologyStructure.from_dict(json.loads("{the_json_above}"))
ontology = encord_client.create_ontology(
title="Your ontology title",
structure=structure
)
print(ontology.ontology_hash)
The goal is create an agent that takes a labeling task from Figure A to Figure B, below (Hint: you can click them and use keyboard arrows toggle between images).
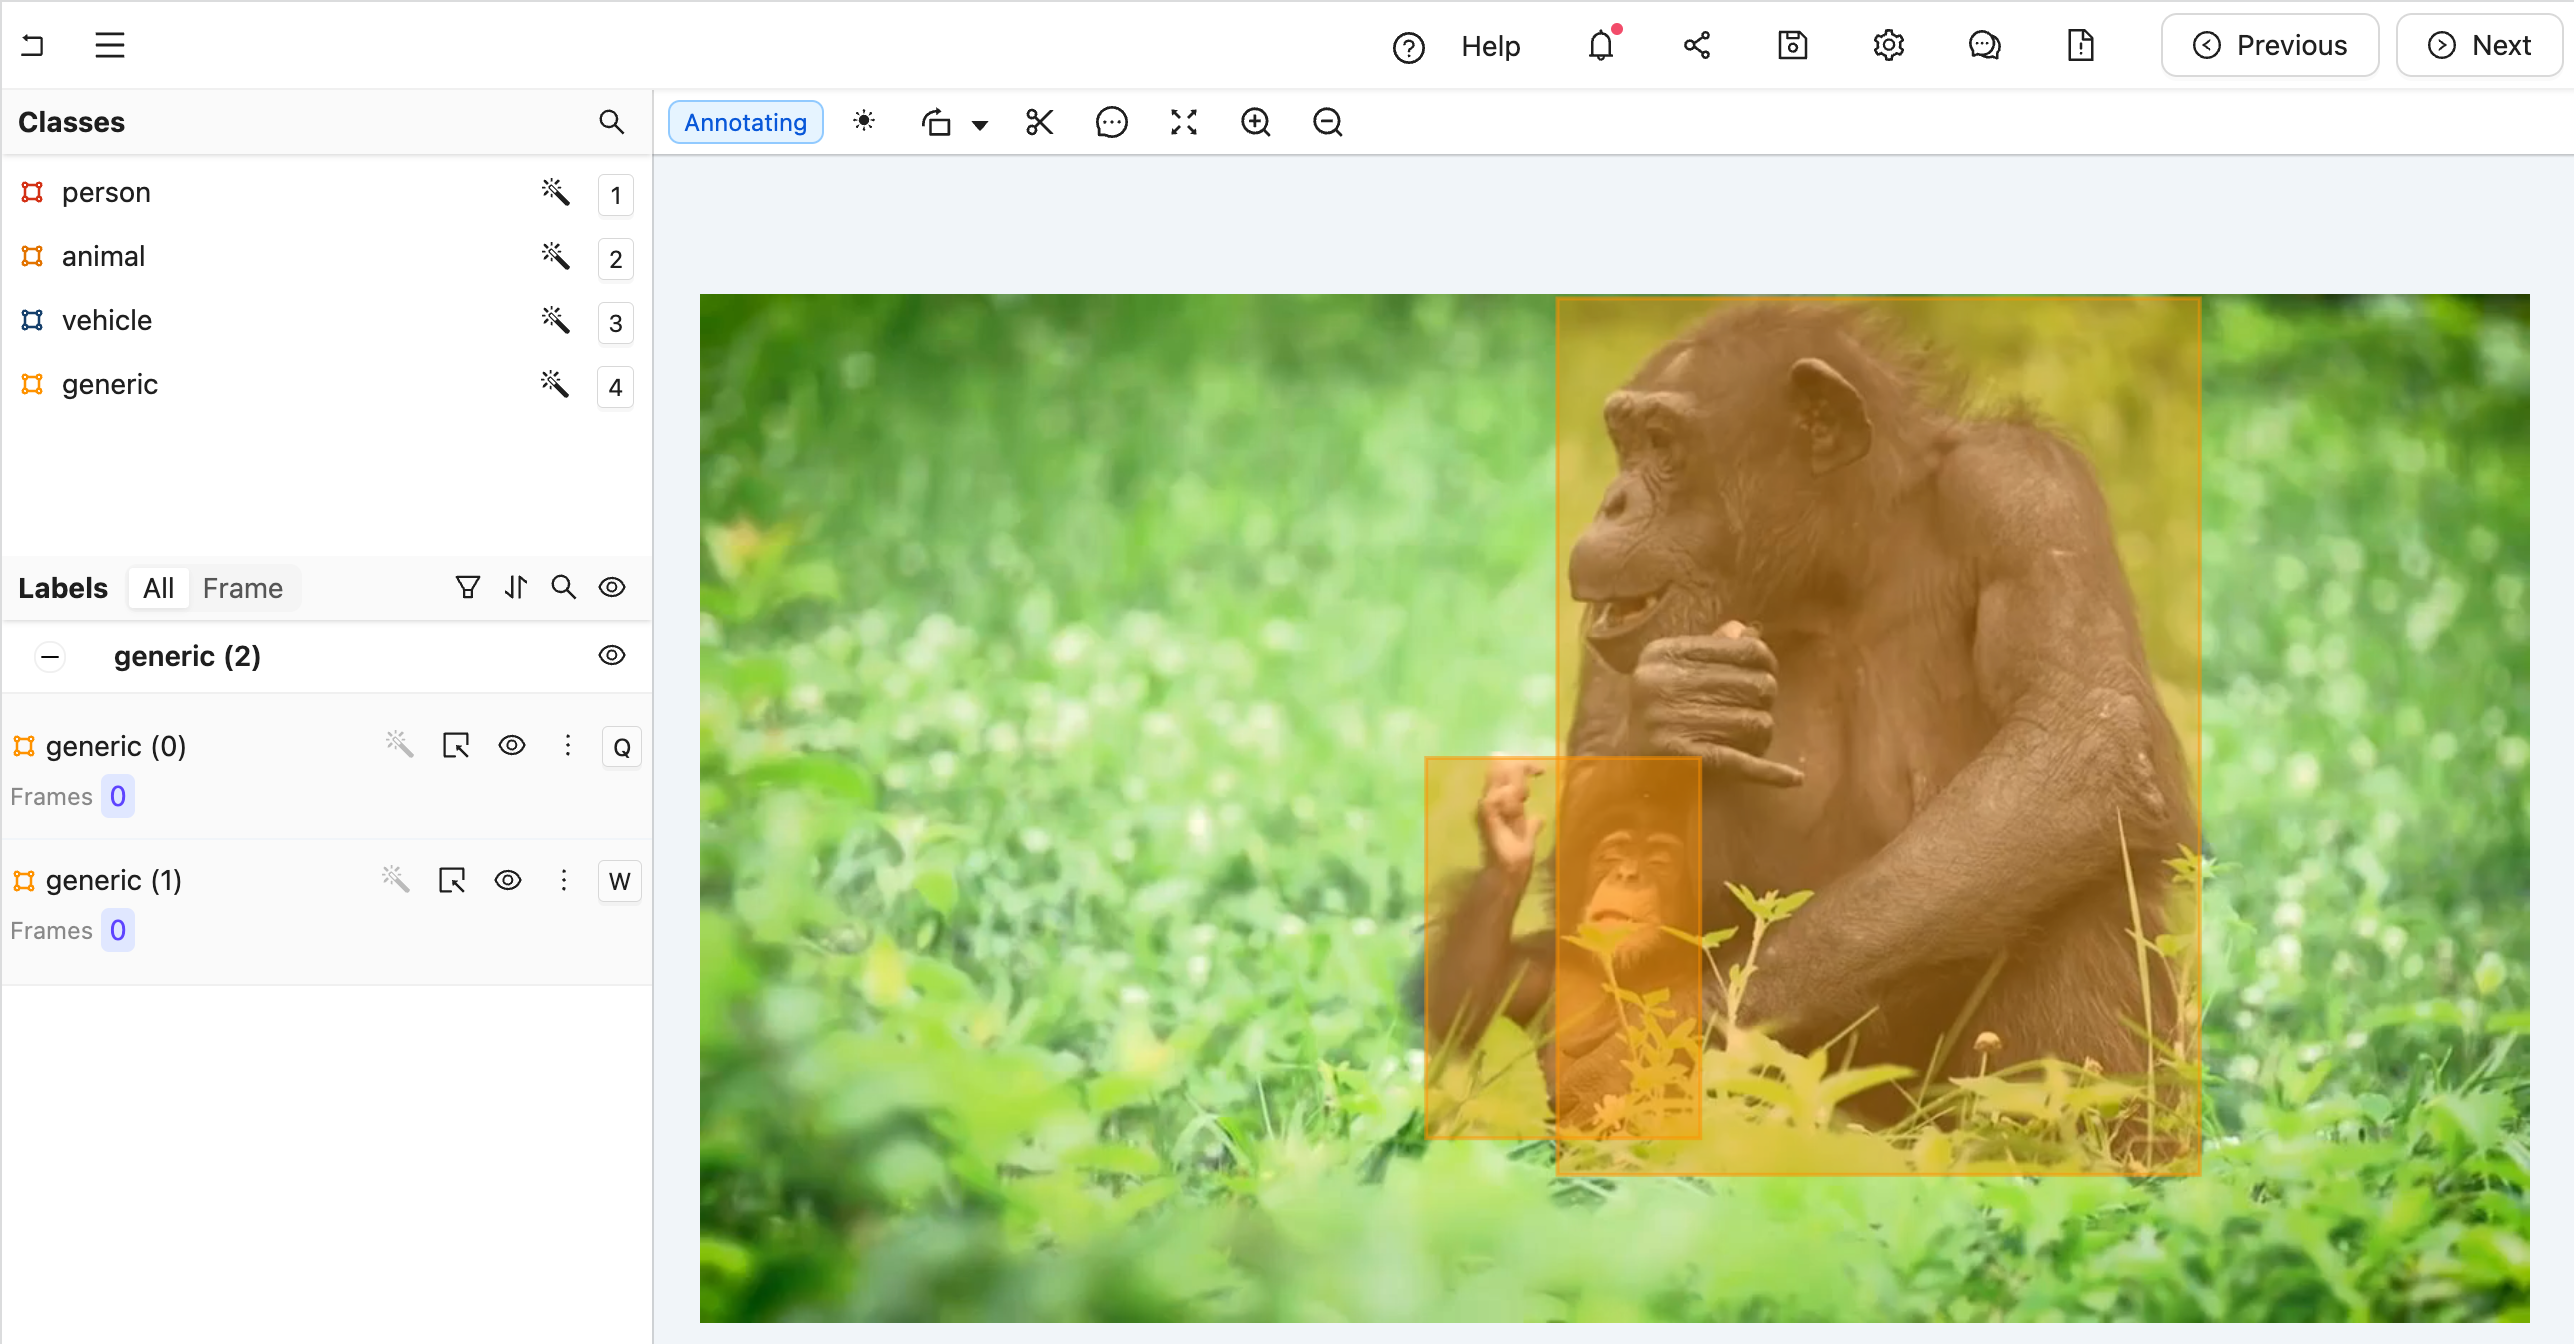 Figure A: A generic label without any type annotations. Notice that in the left sidebar, there are two "generic" labels.
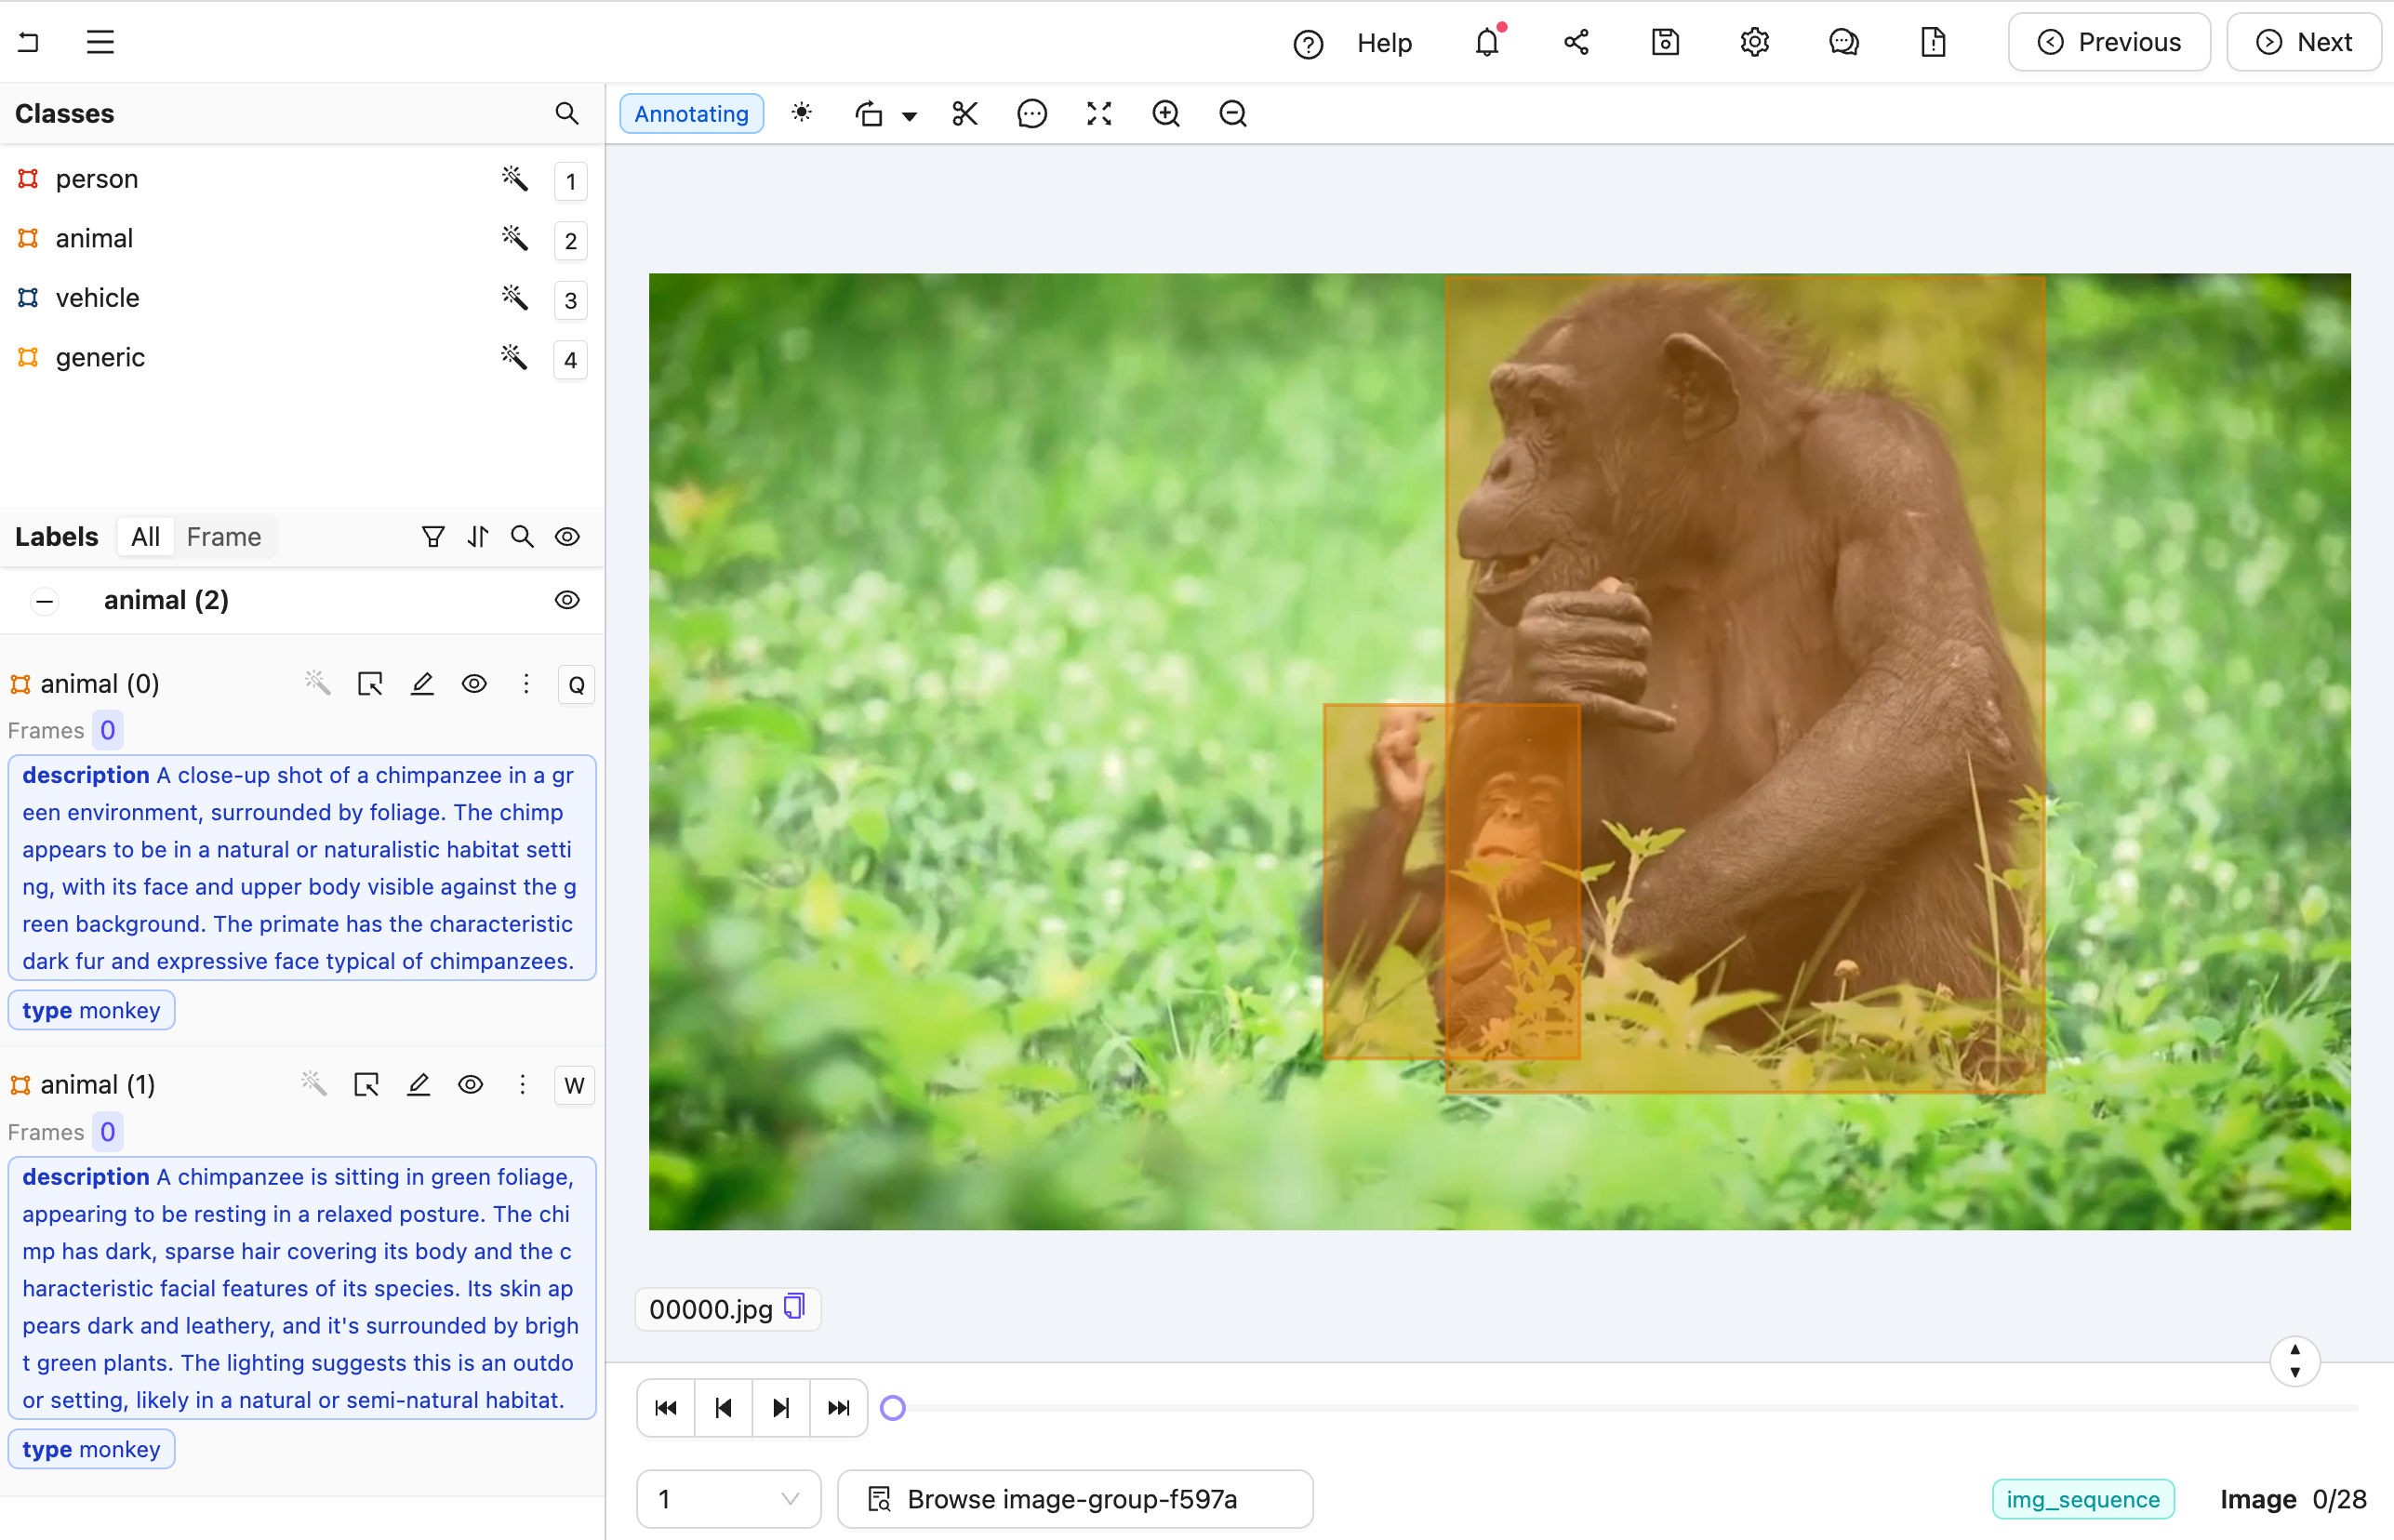 Figure B: A nested label with all details filled for the predicted class. Notice that in the left sidebar, there are two "animal" labels with both type and description filled.
Create the Agent
Warning
Some code blocks in this section have incorrect indentation. If you plan to copy and paste, we strongly recommend using the full code below instead of the individual sub-sections.
Here is the full code, but a section-by-section explanation follows.
The full code for agent.py
- Create a file called
"agent.py". -
Run the following imports and read the Project Ontology. Ensure that you replace
<project_hash>with the unique identifier of your Project.agent.pyimport os from anthropic import Anthropic from encord.objects.ontology_labels_impl import LabelRowV2 from typing_extensions import Annotated from encord_agents.core.ontology import OntologyDataModel from encord_agents.core.utils import get_user_client from encord_agents.gcp import Depends, editor_agent from encord_agents.gcp.dependencies import FrameData, InstanceCrop, dep_object_crops # User client client = get_user_client() project = client.get_project("<project_hash>") -
Extract the generic Ontology object and the Ontology objects that we are interested in. The following code sorts the Ontology objects based on whether they have the title
"generic"or not.
We use the generic object to query image crops within the agent. Before doing so, we utilizeother_objectsto communicate the specific information we want Claude to focus on.
To facilitate this, theOntologyDataModelclass helps translate Encord OntologyObjectsinto a Pydantic model, as well as convert JSON objects into EncordObjectInstances. -
Prepare the system prompt to go along with every object crop. For that, we use the
data_modelfrom above to create the json schema. It is worth noticing that we pass in just theother_objetcssuch that the model is only allowed to choose between the object types that are not of the generic one.agent.pydata_model = OntologyDataModel(other_objects) system_prompt = f""" You're a helpful assistant that's supposed to help fill in json objects according to this schema: `{data_model.model_json_schema_str}` Please only respond with valid json. """See the result of
data_model.model_json_schema_strfor the given example{ "$defs": { "ActivityTextModel": { "properties": { "feature_node_hash": { "const": "aFCN9MMm", "description": "UUID for discrimination. Must be included in json as is.", "enum": [ "aFCN9MMm" ], "title": "Feature Node Hash", "type": "string" }, "value": { "description": "Please describe the image as accurate as possible focusing on 'activity'", "maxLength": 1000, "minLength": 0, "title": "Value", "type": "string" } }, "required": [ "feature_node_hash", "value" ], "title": "ActivityTextModel", "type": "object" }, "AnimalNestedModel": { "properties": { "feature_node_hash": { "const": "3y6JxTUX", "description": "UUID for discrimination. Must be included in json as is.", "enum": [ "3y6JxTUX" ], "title": "Feature Node Hash", "type": "string" }, "type": { "$ref": "#/$defs/TypeRadioModel", "description": "A mutually exclusive radio attribute to choose exactly one option that best matches to the give visual input." }, "description": { "$ref": "#/$defs/DescriptionTextModel", "description": "A text attribute with carefully crafted text to describe the property." } }, "required": [ "feature_node_hash", "type", "description" ], "title": "AnimalNestedModel", "type": "object" }, "DescriptionTextModel": { "properties": { "feature_node_hash": { "const": "5fFgrM+E", "description": "UUID for discrimination. Must be included in json as is.", "enum": [ "5fFgrM+E" ], "title": "Feature Node Hash", "type": "string" }, "value": { "description": "Please describe the image as accurate as possible focusing on 'description'", "maxLength": 1000, "minLength": 0, "title": "Value", "type": "string" } }, "required": [ "feature_node_hash", "value" ], "title": "DescriptionTextModel", "type": "object" }, "PersonNestedModel": { "properties": { "feature_node_hash": { "const": "2xlDPPAG", "description": "UUID for discrimination. Must be included in json as is.", "enum": [ "2xlDPPAG" ], "title": "Feature Node Hash", "type": "string" }, "activity": { "$ref": "#/$defs/ActivityTextModel", "description": "A text attribute with carefully crafted text to describe the property." } }, "required": [ "feature_node_hash", "activity" ], "title": "PersonNestedModel", "type": "object" }, "TypeRadioEnum": { "enum": [ "dolphin", "monkey", "dog", "cat" ], "title": "TypeRadioEnum", "type": "string" }, "TypeRadioModel": { "properties": { "feature_node_hash": { "const": "2P7LTUZA", "description": "UUID for discrimination. Must be included in json as is.", "enum": [ "2P7LTUZA" ], "title": "Feature Node Hash", "type": "string" }, "choice": { "$ref": "#/$defs/TypeRadioEnum", "description": "Choose exactly one answer from the given options." } }, "required": [ "feature_node_hash", "choice" ], "title": "TypeRadioModel", "type": "object" }, "TypeShortAndConciseTextModel": { "properties": { "feature_node_hash": { "const": "79mo1G7Q", "description": "UUID for discrimination. Must be included in json as is.", "enum": [ "79mo1G7Q" ], "title": "Feature Node Hash", "type": "string" }, "value": { "description": "Please describe the image as accurate as possible focusing on 'type - short and concise'", "maxLength": 1000, "minLength": 0, "title": "Value", "type": "string" } }, "required": [ "feature_node_hash", "value" ], "title": "TypeShortAndConciseTextModel", "type": "object" }, "VehicleNestedModel": { "properties": { "feature_node_hash": { "const": "llw7qdWW", "description": "UUID for discrimination. Must be included in json as is.", "enum": [ "llw7qdWW" ], "title": "Feature Node Hash", "type": "string" }, "type__short_and_concise": { "$ref": "#/$defs/TypeShortAndConciseTextModel", "description": "A text attribute with carefully crafted text to describe the property." }, "visible": { "$ref": "#/$defs/VisibleChecklistModel", "description": "A collection of boolean values indicating which concepts are applicable according to the image content." } }, "required": [ "feature_node_hash", "type__short_and_concise", "visible" ], "title": "VehicleNestedModel", "type": "object" }, "VisibleChecklistModel": { "properties": { "feature_node_hash": { "const": "OFrk07Ds", "description": "UUID for discrimination. Must be included in json as is.", "enum": [ "OFrk07Ds" ], "title": "Feature Node Hash", "type": "string" }, "wheels": { "description": "Is 'wheels' applicable or not?", "title": "Wheels", "type": "boolean" }, "frame": { "description": "Is 'frame' applicable or not?", "title": "Frame", "type": "boolean" }, "chain": { "description": "Is 'chain' applicable or not?", "title": "Chain", "type": "boolean" }, "head_lights": { "description": "Is 'head lights' applicable or not?", "title": "Head Lights", "type": "boolean" }, "tail_lights": { "description": "Is 'tail lights' applicable or not?", "title": "Tail Lights", "type": "boolean" } }, "required": [ "feature_node_hash", "wheels", "frame", "chain", "head_lights", "tail_lights" ], "title": "VisibleChecklistModel", "type": "object" } }, "properties": { "choice": { "description": "Choose exactly one answer from the given options.", "discriminator": { "mapping": { "2xlDPPAG": "#/$defs/PersonNestedModel", "3y6JxTUX": "#/$defs/AnimalNestedModel", "llw7qdWW": "#/$defs/VehicleNestedModel" }, "propertyName": "feature_node_hash" }, "oneOf": [ { "$ref": "#/$defs/PersonNestedModel" }, { "$ref": "#/$defs/AnimalNestedModel" }, { "$ref": "#/$defs/VehicleNestedModel" } ], "title": "Choice" } }, "required": [ "choice" ], "title": "ObjectsRadioModel", "type": "object" } -
With the system prompt ready, instantiate an API client for Claude.
-
Define the editor agent.
- All arguments are automatically injected when the agent is called. For details on dependency injection, see here.
- The
dep_object_cropsdependency allows filtering. In this case, it includes only "generic" object crops, excluding those already converted to actual labels.
-
Call Claude using the image crops. Notice how the
cropvariable has a convenientb64_encodingmethod to produce an input that Claude understands.
# Query Claude
changes = False
for crop in crops:
message = anthropic_client.messages.create(
model="claude-3-5-sonnet-20241022",
max_tokens=1024,
system=system_prompt,
messages=[
{
"role": "user",
"content": [crop.b64_encoding(output_format="anthropic")],
}
],
)
-
To parse the message from Claude, the
data_modelis again useful. When called with a JSON string, it attempts to parse it with respect to the the JSON schema we saw above to create an Encord object instance. If successful, the old generic object can be removed and the newly classified object added.agent.pytry: instance = data_model(message.content[0].text) coordinates = crop.instance.get_annotation(frame=frame_data.frame).coordinates instance.set_for_frames( coordinates=coordinates, frames=frame_data.frame, confidence=0.5, manual_annotation=False, ) lr.remove_object(crop.instance) lr.add_object_instance(instance) changes = True except Exception: import traceback traceback.print_exc() print(f"Response from model: {message.content[0].text}") -
Save the labels with Encord.
Test the Agent
-
In your current terminal, run the following command to run the agent in debug mode.
-
Open your Project in the Encord platform and navigate to a frame you want to add a generic object to. Copy the URL from your browser.
Hint
The url should have the following format:
"https://app.encord.com/label_editor/{project_hash}/{data_hash}/{frame}". -
In another shell operating from the same working directory, source your virtual environment and test the agent.
-
To see if the test is successful, refresh your browser to view the classifications generated by Claude. Once the test runs successfully, you are ready to deploy your agent. Visit the deployment documentation to learn more.
Video Recaptioning using GPT-4o-mini
The goals of this example are:
- Create an editor agent that automatically generates multiple variations of video captions.
- Demonstrate how to use OpenAI's GPT-4o-mini model to enhance human-created video captions.
Prerequisites
Before you begin, ensure you have:
- Created a virtual Python environment.
- Installed all necessary dependencies.
- Have an OpenAI API key.
- Are able to authenticate with Encord.
Run the following commands to set up your environment:
python -m venv venv # Create a virtual Python environment
source venv/bin/activate # Activate the virtual environment
python -m pip install encord-agents langchain-openai functions-framework openai # Install required dependencies
export OPENAI_API_KEY="<your-api-key>" # Set your OpenAI API key
export ENCORD_SSH_KEY_FILE="/path/to/your/private/key" # Define your Encord SSH key
Project Setup
Create a Project with video content in Encord.
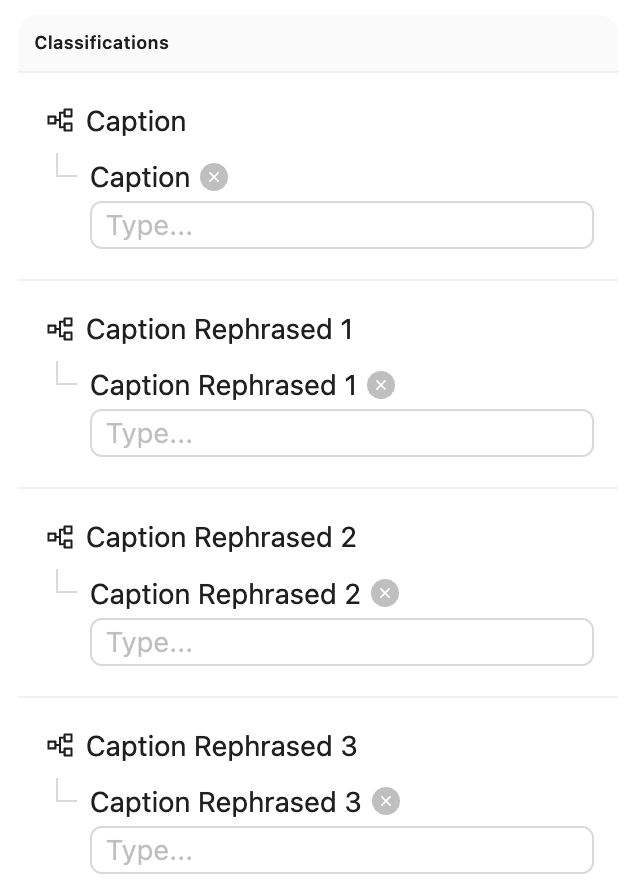
This example requires an ontology with four text classifications as demonstrated in the figure below:
- 1) A text classification for human-created summaries of what's happening in the video.
- 2-4) Three text classifications that will be automatically filled by the LLM.
 Ontology
Expand to see ontology JSON
{
"objects": [],
"classifications": [
{
"id": "1",
"featureNodeHash": "GCH8VHIK",
"attributes": [
{
"id": "1.1",
"name": "Caption",
"type": "text",
"required": false,
"featureNodeHash": "Yg7xXEfC"
}
]
},
{
"id": "2",
"featureNodeHash": "PwQAwYid",
"attributes": [
{
"id": "2.1",
"name": "Caption Rephrased 1",
"type": "text",
"required": false,
"featureNodeHash": "aQdXJwbG"
}
]
},
{
"id": "3",
"featureNodeHash": "3a/aSnHO",
"attributes": [
{
"id": "3.1",
"name": "Caption Rephrased 2",
"type": "text",
"required": false,
"featureNodeHash": "8zY6H62x"
}
]
},
{
"id": "4",
"featureNodeHash": "FNjXp5TU",
"attributes": [
{
"id": "4.1",
"name": "Caption Rephrased 3",
"type": "text",
"required": false,
"featureNodeHash": "sKg1Kq/m"
}
]
}
]
}
Code for generating a compatible ontology
import json
from encord.objects.ontology_structure import OntologyStructure
from encord.objects.attributes import TextAttribute
structure = OntologyStructure()
caption = structure.add_classification()
caption.add_attribute(TextAttribute, "Caption")
re1 = structure.add_classification()
re1.add_attribute(TextAttribute, "Recaption 1")
re2 = structure.add_classification()
re2.add_attribute(TextAttribute, "Recaption 2")
re3 = structure.add_classification()
re3.add_attribute(TextAttribute, "Recaption 3")
print(json.dumps(structure.to_dict(), indent=2))
create_ontology = False
if create_ontology:
from encord.user_client import EncordUserClient
client = EncordUserClient.create_with_ssh_private_key() # Look in auth section for authentication
client.create_ontology("title", "description", structure)
As the figure below depicts, the workflow for this agent is:
- A human views the video and enters a caption in the first text field.
- The agent is triggered, which fills the three other caption fields with variations for the human to review and potentially correct.
Every video is being annotated with a caption by a human (the pink node). Successively, a data agent produces multiple new captions automatically (the purple node). Finally, a humans reviews all four captions (the yellow node) before the item is complete. If there are no human captions when the task reaches the data agent, it sends it back for annotation. Similarly, if the task is rejected during review, it is also sent back for another round of annotation.
 Workflow
Create the Agent
Here is the full code, but a section-by-section explanation follows.
The full code for main.py
| main.py | |
|---|---|
1 2 3 4 5 6 7 8 9 10 11 12 13 14 15 16 17 18 19 20 21 22 23 24 25 26 27 28 29 30 31 32 33 34 35 36 37 38 39 40 41 42 43 44 45 46 47 48 49 50 51 52 53 54 55 56 57 58 59 60 61 62 63 64 65 66 67 68 69 70 71 72 73 74 75 76 77 78 79 80 81 82 83 84 85 86 87 88 89 90 91 92 93 94 95 96 97 98 99 100 101 102 103 104 105 106 107 108 109 110 111 112 113 114 115 116 117 118 119 120 121 122 123 124 125 126 127 128 129 130 131 132 133 134 135 136 137 138 139 140 141 142 143 144 145 146 147 148 149 150 151 152 153 154 155 156 157 158 159 160 161 162 163 164 165 166 167 168 169 170 171 172 173 174 175 176 177 178 179 180 181 182 183 184 185 186 | |
-
First, we define our imports and create a Pydantic model for our LLM's structured output:
main.pyimport os from typing import Annotated import numpy as np from encord.exceptions import LabelRowError from encord.objects.classification_instance import ClassificationInstance from encord.objects.ontology_labels_impl import LabelRowV2 from langchain_openai import ChatOpenAI from numpy.typing import NDArray from pydantic import BaseModel from encord_agents import FrameData from encord_agents.gcp import Depends, editor_agent from encord_agents.gcp.dependencies import Frame, dep_single_frame # The response model for the agent to follow. class AgentCaptionResponse(BaseModel): rephrase_1: str rephrase_2: str -
Next, we create a detailed system prompt for the LLM that explains exactly what kind of rephrasing we want:
main.py# System prompt for the LLM to follow. # You should tailor this to your needs. SYSTEM_PROMPT = """ You are a helpful assistant that rephrases captions. I will provide you with a video caption and an image of the scene of the video. The captions follow this format: "The droid picks up <cup_0> and puts it on the <table_0>." The captions that you make should replace the tags, e.g., <cup_0>, with the actual object names. The replacements should be consistent with the scene. Here are three rephrases: 1. The droid picks up the blue mug and puts it on the left side of the table. 2. The droid picks up the cup and puts it to the left of the plate. 3. The droid is picking up the mug on the right side of the table and putting it down next to the plate. You will rephrase the caption in three different ways, as above, the rephrases should be 1. Diverse in terms of adjectives, object relations, and object positions. 2. Sound in relation to the scene. You cannot talk about objects you cannot see. 3. Short and concise. Keep it within one sentence. -
We configure our LLM to use structured outputs based on our model:
-
We create a helper function to prompt the model with both text and image:
main.pydef prompt_gpt(caption: str, image: Frame) -> AgentCaptionResponse: prompt = [ {"role": "system", "content": SYSTEM_PROMPT}, { "role": "user", "content": [ {"type": "text", "text": f"Video caption: `{caption}`"}, image.b64_encoding(output_format="openai"), ], }, ] return llm_structured.invoke(prompt) -
Finally, we define the main agent function:
main.py# Define the agent. This is the function that will be running # as an API endpoint on GCP. Notice the name which is the # name that we use in the `functions-framework ...` command above. @editor_agent() def my_agent( frame_data: FrameData, label_row: LabelRowV2, frame_content: Annotated[NDArray[np.uint8], Depends(dep_single_frame)], ) -> None: # Get the relevant ontology information # Recall that we expect # [human annotation, llm recaption 1, llm recaption 2, llm recaption 3] # in the Ontology cap, *rs = label_row.ontology_structure.classifications # Read the existing human caption if there are more captions, # we'll take the one from the current frame if it exists # otherwise the one from frame zero or any caption, in said order. instances = label_row.get_classification_instances( filter_ontology_classification=cap, filter_frames=[0, frame_data.frame] ) if not instances: # nothing to do if there are no human labels return elif len(instances) > 1: def order_by_current_frame_else_frame_0( instance: ClassificationInstance, ) -> bool: try: instance.get_annotation(frame_data.frame) return 2 # The best option except LabelRowError: pass try: instance.get_annotation(0) return 1 except LabelRowError: return 0 instance = sorted(instances, key=order_by_current_frame_else_frame_0)[-1] else: instance = instances[0] # Read the actual string caption caption = instance.get_answer() # Run the first frame of the video and the human caption # against the llm frame = Frame(frame=0, content=frame_content) response = prompt_gpt(caption, frame) # Upsert the new captions for r, t in zip(rs, [response.rephrase_1, response.rephrase_2, response.rephrase_3]): # Overwrite any existing re-captions existing_instances = label_row.get_classification_instances(filter_ontology_classification=r) for existing_instance in existing_instances: label_row.remove_classification(existing_instance) # Create new instances ins = r.create_instance() ins.set_answer(t, attribute=r.attributes[0]) ins.set_for_frames(0) label_row.add_classification_instance(ins) label_row.save()
The agent follows these steps:
- It retrieves the existing human-created caption, prioritizing captions from the current frame or falling back to frame zero.
- It sends the first frame of the video along with the human caption to the LLM.
- It processes the LLM's response, which contains three different rephrasings of the original caption.
- It updates the label row with the new captions, replacing any existing ones.
Test the Agent
-
In your current terminal, run the following command to run the agent in debug mode:
-
Open your Project in the Encord platform, navigate to a video frame, and add your initial caption. Copy the URL from your browser.
-
In another shell operating from the same working directory, source your virtual environment and test the agent:
-
Refresh your browser to view the three AI-generated caption variations. Once the test runs successfully, you are ready to deploy your agent. Visit the deployment documentation to learn more.
FastAPI Examples
Basic Geometric example using objectHashes
A simple example of how you might utilise the objectHashes can be done via:
from typing import Annotated
from encord.objects.ontology_labels_impl import LabelRowV2
from encord.objects.ontology_object_instance import ObjectInstance
from fastapi import Depends, FastAPI
from encord_agents.fastapi.cors import get_encord_app()
from encord_agents.fastapi.dependencies import (
FrameData,
dep_label_row,
dep_objects,
)
# Initialize FastAPI app
app = get_encord_app()
@app.post("/handle-object-hashes")
def handle_object_hashes(
frame_data: FrameData,
lr: Annotated[LabelRowV2, Depends(dep_label_row)],
object_instances: Annotated[list[ObjectInstance], Depends(dep_objects)],
) -> None:
for object_inst in object_instances:
print(object_inst)
An example use case of the above: Suppose that I have my own OCR model and I want to selectively run OCR on objects I've selected from the Encord app. You can then trigger your agent from the app and it'll appropriately send a list of objectHashes to your agent. Then via the dep_objects method above, it gives the agent immediate access to the object instance making it easier to integrate your OCR model.
Test the Agent
-
First save the above code as main.py then in your current terminal run the following command to runFastAPI server in development mode with auto-reload enabled.
-
Open your Project in the Encord platform and navigate to a frame with an object that you want to act on. Choose an object from the bottom left sider and click
Copy URLas shown:
!!! tip
The url should have roughly this format: "https://app.encord.com/label_editor/{project_hash}/{data_hash}/{frame}/0?other_query_params&objectHash={objectHash}".
-
In another shell operating from the same working directory, source your virtual environment and test the agent.
-
To see if the test is successful, refresh your browser to see the action taken by the Agent. Once the test runs successfully, you are ready to deploy your agent. Visit the deployment documentation to learn more.
Nested Classification using Claude 3.5 Sonnet
The goals of this example is to:
- Create an editor agent that can automatically fill in frame-level classifications in the Label Editor.
- Demonstrate how to use the
OntologyDataModelfor classifications. - Demonstrate how to build an agent using FastAPI that can be self-hosted.
Prerequisites
Before you begin, ensure you have:
- Created a virtual Python environment.
- Installed all necessary dependencies.
- Have an Anthropic API key.
- Are able to authenticate with Encord.
Run the following commands to set up your environment:
python -m venv venv # Create a virtual Python environment
source venv/bin/activate # Activate the virtual environment
python -m pip install "fastapi[standard]" encord-agents anthropic # Install required dependencies
export ANTHROPIC_API_KEY="<your_api_key>" # Set your Anthropic API key
export ENCORD_SSH_KEY_FILE="/path/to/your/private/key" # Define your Encord SSH key
Project Setup
Create a Project with visual content (images, image groups, image sequences, or videos) in Encord. This example uses the following Ontology, but any Ontology containing classifications can be used.
See the ontology JSON
[Same JSON as in GCP Frame Classification example]
The aim is to trigger an agent that transforms a labeling task from Figure A to Figure B. (Hint: Click the images and use the keyboard arrows to toggle between them.)
Figure A: no classification labels.
Figure B: Multiple nested labels coming from an LLM.
Create the FastAPI agent
Here is the full code, but a section-by-section explanation follows.
The full code for main.py
-
Import dependencies and set up the Project. The CORS middleware is crucial as it allows the Encord platform to make requests to your API.
main.pyimport os import numpy as np from anthropic import Anthropic from encord.objects.ontology_labels_impl import LabelRowV2 from fastapi import Depends from numpy.typing import NDArray from typing_extensions import Annotated from encord_agents.core.data_model import Frame from encord_agents.core.ontology import OntologyDataModel from encord_agents.core.utils import get_user_client from encord_agents.fastapi.cors import get_encord_app from encord_agents.fastapi.dependencies import ( FrameData, dep_label_row, dep_single_frame, ) # Initialize FastAPI app app = get_encord_app() -
Set up the Project and create a data model based on the Ontology.
-
Create the system prompt that tells Claude how to structure its response.
main.pysystem_prompt = f""" You're a helpful assistant that's supposed to help fill in json objects according to this schema: ```json {data_model.model_json_schema_str} ``` Please only respond with valid json. """ ANTHROPIC_API_KEY = os.getenv("ANTHROPIC_API_KEY") anthropic_client = Anthropic(api_key=ANTHROPIC_API_KEY) -
Define the endpoint to handle the classification:
main.py@app.post("/frame_classification") async def classify_frame( frame_data: FrameData, lr: Annotated[LabelRowV2, Depends(dep_label_row)], content: Annotated[NDArray[np.uint8], Depends(dep_single_frame)], ): """Classify a frame using Claude.""" frame = Frame(frame=frame_data.frame, content=content) message = anthropic_client.messages.create( model="claude-3-5-sonnet-20241022", max_tokens=1024, system=system_prompt, messages=[ { "role": "user", "content": [frame.b64_encoding(output_format="anthropic")], } ], ) try: classifications = data_model(message.content[0].text) for clf in classifications: clf.set_for_frames(frame_data.frame, confidence=0.5, manual_annotation=False) lr.add_classification_instance(clf) except Exception: import traceback traceback.print_exc() print(f"Response from model: {message.content[0].text}") lr.save()
The endpoint:
- Receives frame data via FastAPI's Form dependency.
- Retrieves the label row and frame content using Encord agents' dependencies.
- Constructs a
Frameobject with the content. - Sends the frame image to Claude for analysis.
- Parses Claude's response into classification instances.
- Adds classifications to the label row and saves the updated data.
Test the Agent
-
In your current terminal run the following command to runFastAPI server in development mode with auto-reload enabled.
-
Open your Project in the Encord platform and navigate to a frame you want to add a classification to. Copy the URL from your browser.
Tip
The url should have the following format:
"https://app.encord.com/label_editor/{project_hash}/{data_hash}/{frame}". -
In another shell operating from the same working directory, source your virtual environment and test the agent.
-
To see if the test is successful, refresh your browser to view the classifications generated by Claude. Once the test runs successfully, you are ready to deploy your agent. Visit the deployment documentation to learn more.
Nested Attributes using Claude 3.5 Sonnet
The goals of this example are:
- Create an editor agent that can convert generic object annotations (class-less coordinates) into class specific annotations with nested attributes like descriptions, radio buttons, and checklists.
- Demonstrate how to use both the
OntologyDataModeland thedep_object_cropsdependency.
Prerequisites
Before you begin, ensure you have:
- Created a virtual Python environment.
- Installed all necessary dependencies.
- Have an Anthropic API key.
- Are able to authenticate with Encord.
Run the following commands to set up your environment:
python -m venv venv                 # Create a virtual Python environment
source venv/bin/activate            # Activate the virtual environment
python -m pip install encord-agents anthropic  # Install required dependencies
export ANTHROPIC_API_KEY="<your_api_key>"     # Set your Anthropic API key
export ENCORD_SSH_KEY_FILE="/path/to/your/private/key"  # Define your Encord SSH key
Project Setup
Create a Project with visual content (images, image groups, image sequences, or videos) in Encord. This example uses the following Ontology, but any Ontology containing classifications can be used provided the object types are the same and there is one entry called "generic".
See the ontology JSON
[Same JSON as in GCP Object Classification example]
The goal is to trigger an agent that takes a labeling task from Figure A to Figure B, below:
Figure A: A generic label without any type annotations.
Figure B: A nested label with all details filled for the predicted class.
Create the FastAPI Agent
Here is the full code, but a section-by-section explanation follows.
The full code for main.py
-
Set up the FastAPI app and CORS middleware.
main.pyimport os from anthropic import Anthropic from encord.objects.ontology_labels_impl import LabelRowV2 from fastapi import Depends from typing_extensions import Annotated from encord_agents.core.data_model import InstanceCrop from encord_agents.core.ontology import OntologyDataModel from encord_agents.core.utils import get_user_client from encord_agents.fastapi.cors import get_encord_app from encord_agents.fastapi.dependencies import ( FrameData, dep_label_row, dep_object_crops, ) # Initialize FastAPI app app = get_encord_app() -
Set up the client, Project, and extract the generic Ontology object.
-
Create the data model and system prompt for Claude.
main.pydata_model = OntologyDataModel(other_objects) system_prompt = f""" You're a helpful assistant that's supposed to help fill in json objects according to this schema: `{data_model.model_json_schema_str}` Please only respond with valid json. """ # Claude setup ANTHROPIC_API_KEY = os.getenv("ANTHROPIC_API_KEY") anthropic_client = Anthropic(api_key=ANTHROPIC_API_KEY) -
Define the attribute endpoint:
@app.post("/object_classification")
async def classify_objects(
frame_data: FrameData,
lr: Annotated[LabelRowV2, Depends(dep_label_row)],
crops: Annotated[
list[InstanceCrop],
Depends(dep_object_crops(filter_ontology_objects=[generic_ont_obj])),
],
):
"""Classify generic objects using Claude."""
# Query Claude for each crop
changes = False
for crop in crops:
message = anthropic_client.messages.create(
model="claude-3-haiku-20240307",
max_tokens=1024,
system=system_prompt,
messages=[
{
"role": "user",
"content": [crop.b64_encoding(output_format="anthropic")],
}
],
)
# Parse result
try:
instance = data_model(message.content[0].text)
coordinates = crop.instance.get_annotation(frame=frame_data.frame).coordinates
instance.set_for_frames(
coordinates=coordinates,
frames=frame_data.frame,
confidence=0.5,
manual_annotation=False,
)
lr.remove_object(crop.instance)
lr.add_object_instance(instance)
changes = True
except Exception:
import traceback
traceback.print_exc()
print(f"Response from model: {message.content[0].text}")
# Save changes
if changes:
lr.save()
The endpoint:
- Receives frame data using FastAPI's Form dependency.
- Retrieves the label row using
dep_label_row. - Fetches object crops, filtered to include only "generic" objects, using
dep_object_crops. - For each crop:
- Sends the cropped image to Claude for analysis.
- Parses the response into an object instance.
- Replaces the generic object with the classified instance.
- Saves the updated label row.
Testing the Agent
-
In your current terminal run the following command to runFastAPI server in development mode with auto-reload enabled.
-
Open your Project in the Encord platform and navigate to a frame you want to add a classification to. Copy the URL from your browser.
Tip
The url should have roughly this format:
"https://app.encord.com/label_editor/{project_hash}/{data_hash}/{frame}". -
In another shell operating from the same working directory, source your virtual environment and test the agent:
-
To see if the test is successful, refresh your browser to view the classifications generated by Claude. Once the test runs successfully, you are ready to deploy your agent. Visit the deployment documentation to learn more.
Video Recaptioning using GPT-4o-mini
The goals of this example are:
- Create an editor agent that automatically generates multiple variations of video captions.
- Demonstrate how to use OpenAI's GPT-4o-mini model to enhance human-created video captions with a FastAPI-based agent.
Prerequisites
Before you begin, ensure you have:
- Created a virtual Python environment.
- Installed all necessary dependencies.
- Have an OpenAI API key.
- Are able to authenticate with Encord.
Run the following commands to set up your environment:
python -m venv venv # Create a virtual Python environment
source venv/bin/activate # Activate the virtual environment
python -m pip install encord-agents langchain-openai "fastapi[standard]" openai # Install required dependencies
export OPENAI_API_KEY="<your-api-key>" # Set your OpenAI API key
export ENCORD_SSH_KEY_FILE="/path/to/your/private/key" # Define your Encord SSH key
Project Setup
Create a Project with video content in Encord.
This example requires an Ontology with four text classifications:
- 1) A text classification for human-created summaries of what is happening in the video.
- 2-4) Three text classifications that will be automatically filled by the LLM.
Ontology
Expand to see the Ontology JSON
{
"objects": [],
"classifications": [
{
"id": "1",
"featureNodeHash": "GCH8VHIK",
"attributes": [
{
"id": "1.1",
"name": "Caption",
"type": "text",
"required": false,
"featureNodeHash": "Yg7xXEfC"
}
]
},
{
"id": "2",
"featureNodeHash": "PwQAwYid",
"attributes": [
{
"id": "2.1",
"name": "Caption Rephrased 1",
"type": "text",
"required": false,
"featureNodeHash": "aQdXJwbG"
}
]
},
{
"id": "3",
"featureNodeHash": "3a/aSnHO",
"attributes": [
{
"id": "3.1",
"name": "Caption Rephrased 2",
"type": "text",
"required": false,
"featureNodeHash": "8zY6H62x"
}
]
},
{
"id": "4",
"featureNodeHash": "FNjXp5TU",
"attributes": [
{
"id": "4.1",
"name": "Caption Rephrased 3",
"type": "text",
"required": false,
"featureNodeHash": "sKg1Kq/m"
}
]
}
]
}
Code for generating a compatible ontology
import json
from encord.objects.ontology_structure import OntologyStructure
from encord.objects.attributes import TextAttribute
structure = OntologyStructure()
caption = structure.add_classification()
caption.add_attribute(TextAttribute, "Caption")
re1 = structure.add_classification()
re1.add_attribute(TextAttribute, "Recaption 1")
re2 = structure.add_classification()
re2.add_attribute(TextAttribute, "Recaption 2")
re3 = structure.add_classification()
re3.add_attribute(TextAttribute, "Recaption 3")
print(json.dumps(structure.to_dict(), indent=2))
create_ontology = False
if create_ontology:
from encord.user_client import EncordUserClient
client = EncordUserClient.create_with_ssh_private_key() # Look in auth section for authentication
client.create_ontology("title", "description", structure)
As the figure below depicts, the workflow for this agent is:
- A human views the video and enters a caption in the first text field.
- The agent is triggered, which fills the three other caption fields with variations for the human to review and potentially correct.
Every video is being annotated with a caption by a human (the pink node). Successively, a data agent produces multiple new captions automatically (the purple node). Finally, a humans reviews all four captions (the yellow node) before the item is complete. If there are no human captions when the task reaches the data agent, sends it back for annotation. Similarly, if the task is rejected during review, it is also sent back for another round of annotation.
Workflow
Create the Agent
Here is the full code, but a section-by-section explanation follows.
The full code for main.py
| main.py | |
|---|---|
1 2 3 4 5 6 7 8 9 10 11 12 13 14 15 16 17 18 19 20 21 22 23 24 25 26 27 28 29 30 31 32 33 34 35 36 37 38 39 40 41 42 43 44 45 46 47 48 49 50 51 52 53 54 55 56 57 58 59 60 61 62 63 64 65 66 67 68 69 70 71 72 73 74 75 76 77 78 79 80 81 82 83 84 85 86 87 88 89 90 91 92 93 94 95 96 97 98 99 100 101 102 103 104 105 106 107 108 109 110 111 112 113 114 115 116 117 118 119 120 121 122 123 124 125 126 127 128 129 130 131 132 133 134 135 136 137 138 139 140 141 142 143 144 145 146 147 148 149 150 151 152 153 154 155 156 157 158 159 160 161 162 163 164 165 166 167 168 169 170 171 172 173 174 175 176 177 178 179 180 181 182 183 184 185 186 187 188 189 | |
-
First, we set up our imports and create a Pydantic model for our LLM's structured output:
main.pyimport os from typing import Annotated import numpy as np from encord.exceptions import LabelRowError from encord.objects.classification_instance import ClassificationInstance from encord.objects.ontology_labels_impl import LabelRowV2 from fastapi import Depends from langchain_openai import ChatOpenAI from numpy.typing import NDArray from pydantic import BaseModel from encord_agents import FrameData from encord_agents.fastapi.cors import get_encord_app from encord_agents.fastapi.dependencies import Frame, dep_label_row, dep_single_frame # The response model for the agent to follow. class AgentCaptionResponse(BaseModel): rephrase_1: str rephrase_2: str rephrase_3: str -
Next, we create a detailed system prompt for the LLM that explains exactly what kind of rephrasing we want:
main.py# System prompt for the LLM to follow. # You should tailor this to your needs. SYSTEM_PROMPT = """ You are a helpful assistant that rephrases captions. I will provide you with a video caption and an image of the scene of the video. The captions follow this format: "The droid picks up <cup_0> and puts it on the <table_0>." The captions that you make should replace the tags, e.g., <cup_0>, with the actual object names. The replacements should be consistent with the scene. Here are three rephrases: 1. The droid picks up the blue mug and puts it on the left side of the table. 2. The droid picks up the cup and puts it to the left of the plate. 3. The droid is picking up the mug on the right side of the table and putting it down next to the plate. You will rephrase the caption in three different ways, as above, the rephrases should be 1. Diverse in terms of adjectives, object relations, and object positions. 2. Sound in relation to the scene. You cannot talk about objects you cannot see. 3. Short and concise. Keep it within one sentence. """ -
We configure our LLM to use structured outputs based on our model:
-
We create a helper function to prompt the model with both text and image:
main.pydef prompt_gpt(caption: str, image: Frame) -> AgentCaptionResponse: prompt = [ {"role": "system", "content": SYSTEM_PROMPT}, { "role": "user", "content": [ {"type": "text", "text": f"Video caption: `{caption}`"}, image.b64_encoding(output_format="openai"), ], }, ] return llm_structured.invoke(prompt) -
We initialize the FastAPI app with the required CORS middleware:
-
Finally, we define the endpoint that will handle the recaptioning:
main.py@app.post("/my_agent") def my_agent( frame_data: FrameData, label_row: Annotated[LabelRowV2, Depends(dep_label_row)], frame_content: Annotated[NDArray[np.uint8], Depends(dep_single_frame)], ) -> None: # Get the relevant Ontology information # Recall that we expect # [human annotation, llm recaption 1, llm recaption 2, llm recaption 3] # in the Ontology cap, *rs = label_row.ontology_structure.classifications # Read the existing human caption if there are more captions, # we'll take the one from the current frame if it exists # otherwise the one from frame zero or any caption, in said order. instances = label_row.get_classification_instances( filter_ontology_classification=cap, filter_frames=[0, frame_data.frame] ) if not instances: # nothing to do if there are no human labels return elif len(instances) > 1: def order_by_current_frame_else_frame_0( instance: ClassificationInstance, ) -> bool: try: instance.get_annotation(frame_data.frame) return 2 # The best option except LabelRowError: pass try: instance.get_annotation(0) return 1 except LabelRowError: return 0 instance = sorted(instances, key=order_by_current_frame_else_frame_0)[-1] else: instance = instances[0] # Read the actual string caption caption = instance.get_answer() # Run the first frame of the video and the human caption # against the llm frame = Frame(frame=0, content=frame_content) response = prompt_gpt(caption, frame) # Upsert the new captions for r, t in zip(rs, [response.rephrase_1, response.rephrase_2, response.rephrase_3]): # Overwrite any existing re-captions existing_instances = label_row.get_classification_instances(filter_ontology_classification=r) for existing_instance in existing_instances: label_row.remove_classification(existing_instance) # Create new instances ins = r.create_instance() ins.set_answer(t, attribute=r.attributes[0]) ins.set_for_frames(0) label_row.add_classification_instance(ins) label_row.save()
The endpoint follows these steps:
- It retrieves the existing human-created caption, prioritizing captions from the current frame or falling back to frame zero.
- It sends the first frame of the video along with the human caption to the LLM.
- It processes the LLM's response, which contains three different rephrasings of the original caption.
- It updates the label row with the new captions, replacing any existing ones.
Test the Agent
-
In your current terminal, run the following command to run the FastAPI server:
-
Open your Project in the Encord platform, navigate to a video frame, and add your initial caption. Copy the URL from your browser.
-
In another shell operating from the same working directory, source your virtual environment and test the agent:
-
Refresh your browser to view the three AI-generated caption variations. Once the test runs successfully, you are ready to deploy your agent. Visit the deployment documentation to learn more.
Modal Example
Cotracker3 Keypoint tracking
Cotracker3 is a keypoint tracking algorithm from Meta that serves as an excellent example of Modal agents. Cotracker3 involves a moderately sized (100MB) model where deployment on Modal and access to a serverless GPU works excellently.
Prerequisites
Firstly, we would strongly encourage any reader to first read and follow the general Modal tutorial. This provides clear instructions on how to register your Encord credentials in the Modal platform and more straight forward agent code. One new dependency here is that we need to pull in the model weights and have additional ML dependencies. Additionally, create a Python venv with:
as in the original modal tutorial.
Additionally to bring in the cotracker dependency, we found the most straightforward way to be:
Create the Modal Agent
Here is the full code, but a section-by-section explanation follows.
The full code for main.py
| main.py | |
|---|---|
1 2 3 4 5 6 7 8 9 10 11 12 13 14 15 16 17 18 19 20 21 22 23 24 25 26 27 28 29 30 31 32 33 34 35 36 37 38 39 40 41 42 43 44 45 46 47 48 49 50 51 52 53 54 55 56 57 58 59 60 61 62 63 64 65 66 67 68 69 70 71 72 73 74 75 76 77 78 79 80 81 82 83 84 85 86 87 88 89 90 91 92 93 94 95 96 97 98 99 100 101 102 103 104 105 106 107 108 | |
-
Define the Modal image.
main.pyfrom pathlib import Path import modal from encord.objects.coordinates import ( PointCoordinate, ) from encord.objects.ontology_labels_impl import LabelRowV2 from encord.objects.ontology_object_instance import ObjectInstance from fastapi import Depends from typing_extensions import Annotated from encord_agents.fastapi.dependencies import ( FrameData, dep_asset, dep_label_row, dep_objects, ) # 1. Define the Modal Image image = ( modal.Image.debian_slim(python_version="3.12") .apt_install("libgl1", "libglib2.0-0", "wget") .run_commands( "wget https://huggingface.co/facebook/cotracker3/resolve/main/scaled_offline.pth", ) .pip_install( "fastapi[standard]", "encord-agents", "torch", "torchvision", "tqdm", "imageio[ffmpeg]", ) .add_local_python_source("cotracker") ) # 2. Define the Modal app -
Define the modal app.
-
Define the endpoint and Cotracker3 usage
main.py@app.function(secrets=[modal.Secret.from_name("encord-ssh-key")], gpu="L4") @modal.web_endpoint(method="POST") def cotracker3( frame_data: FrameData, lr: Annotated[LabelRowV2, Depends(dep_label_row)], object_instances: Annotated[list[ObjectInstance], Depends(dep_objects)], asset: Annotated[Path, Depends(dep_asset)], ): import imageio import numpy import torch from cotracker.predictor import CoTrackerPredictor model = CoTrackerPredictor(checkpoint="/scaled_offline.pth") if torch.cuda.is_available(): model = model.cuda() assert len(object_instances) == 1 obj_inst = object_instances[0] video = read_video_from_path(asset) video_tensor = torch.from_numpy(video).permute(0, 3, 1, 2)[None].float() if torch.cuda.is_available(): video_tensor = video_tensor.cuda() annotation = obj_inst.get_annotation(frame_data.frame) assert isinstance(annotation.coordinates, PointCoordinate) assert lr.width assert lr.height query = torch.tensor( [ # Frame num, W,H [ frame_data.frame, annotation.coordinates.x * lr.width, annotation.coordinates.y * lr.height, ], ] ) if torch.cuda.is_available(): query = query.cuda() pred_tracks, _ = model(video_tensor, queries=query[None]) for frame_num, coord in enumerate(pred_tracks.reshape(-1, 2)): try: obj_inst.set_for_frames( coordinates=PointCoordinate(x=float(coord[0]) / lr.width, y=float(coord[1]) / lr.height), frames=frame_num, ) except Exception: continue lr.save()
Create the Modal Agent
Once the above (full) code has been saved at app.py say, it can be deployed with: modal deploy app.py. Please note that it is written to use an L4 GPU so there will be some usage charges but this model can easily be used and tested within Modal's $5 free allowance.
This agent then utilises the tracking prompted on agents so to trigger, please right-click on a keypoint in the platform and trigger with this agent.
Agent Examples in the Making
The following example are being worked on:
- Tightening Bounding Boxes with SAM
- Extrapolating labels with DINOv
- Triggering internal notification system
- Label assertion